¶ My Account
¶ My Profile
Here you can view and update your account profile and related information.
- Name: The first name associated with the signed-in user's profile.
- Surname: The surname associated with the signed-in user's profile.
- Mobile: The mobile number associated with the signed-in user's profile.
- E-mail: The e-mail address / Username associated with the signed-in user's profile.
- Customer: The customer account the user is a member of.
- Timezone: Select your timezone according to your regional location. Note: the date and timestamps throughout the platform and sent notifications will be affected by the selected timezone.
- Role: The role associated with the signed-in user's profile.
- Show Assistant: Enable the in-app assistant on supported modules.
- Reset Assistant: Reset the in-app assistant.
- Last Login CORE: The date and time the user last signed into the CORE web app.
- Last Login CORE Mobile: The date and time the user last signed into the CORE mobile app.
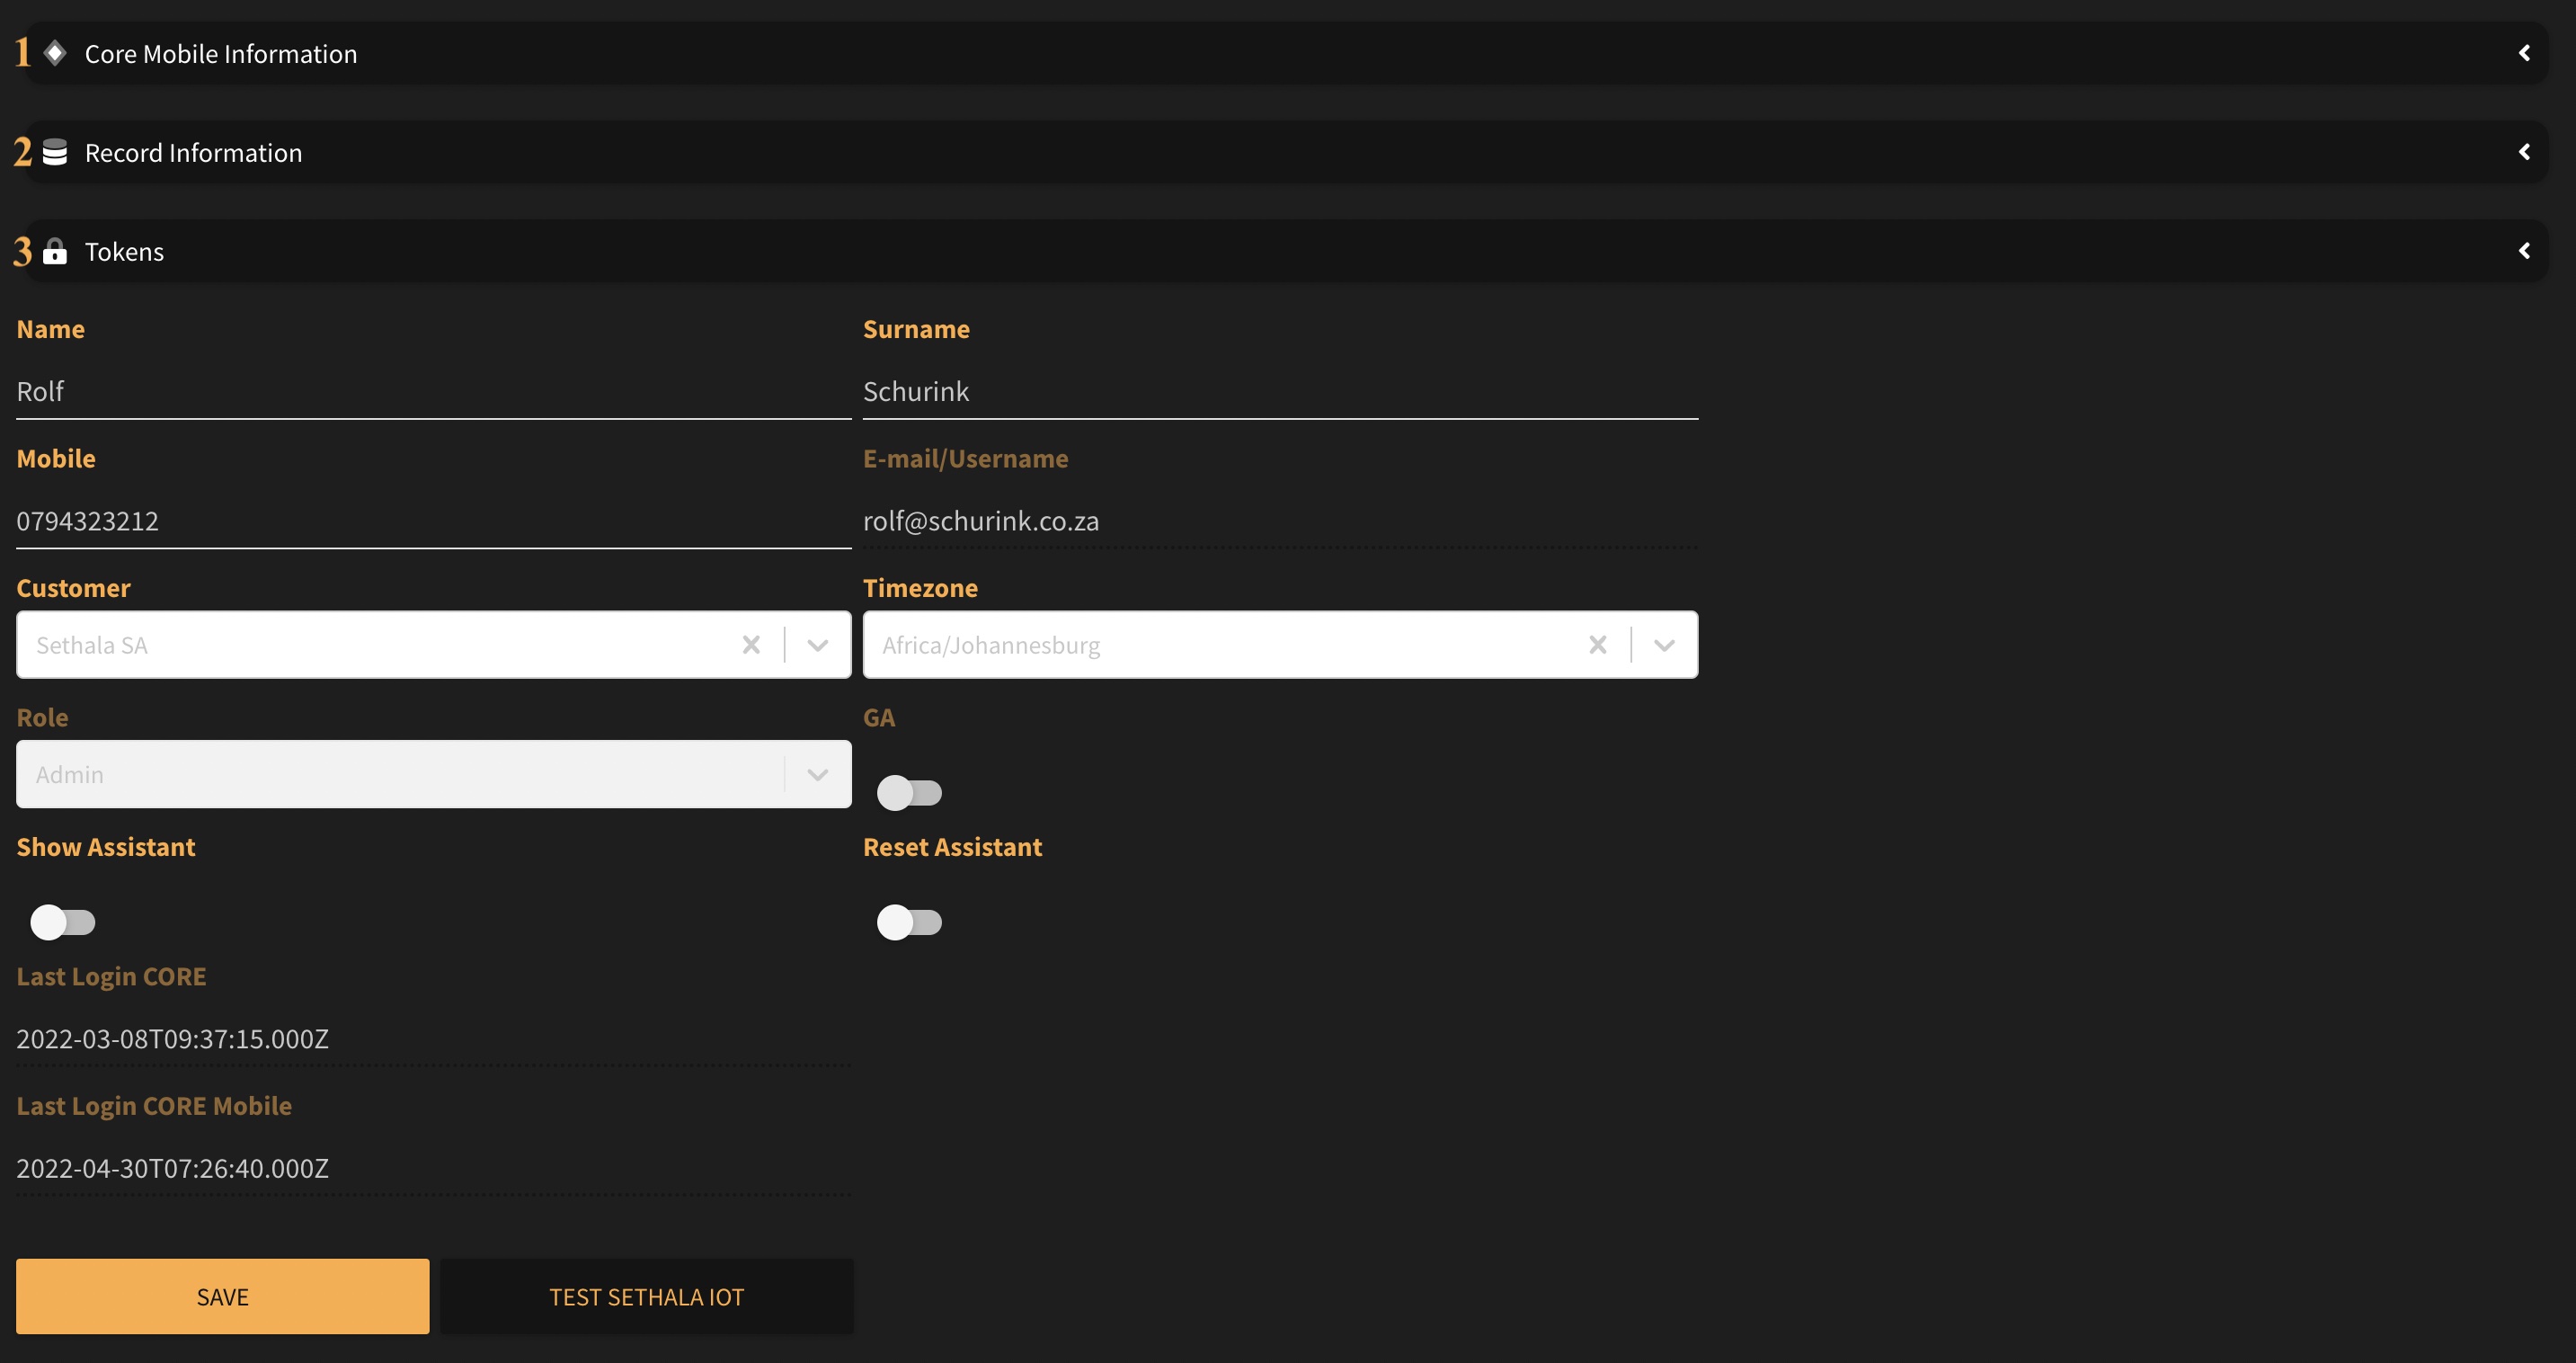
Clicking each of the collapsable sections revels the following:
- 1 → Core Mobile Information: The version, registered server and other related information of the user's CORE mobile profile.
- 2 → Record Information: Detailed information of the signed-in user's profile.
- 3 → Tokens: User's token required for accessing CORE API.
Button options:
- Save → Click to save any changes make to the form.
- Test Sethala IoT → After successfully signing into Sethala CORE mobile app, click this button to test push notifications.
¶ Contacts
Manage contact people who needs to receive alert notifications and/or scheduled e-mailed reports of assigned Things.
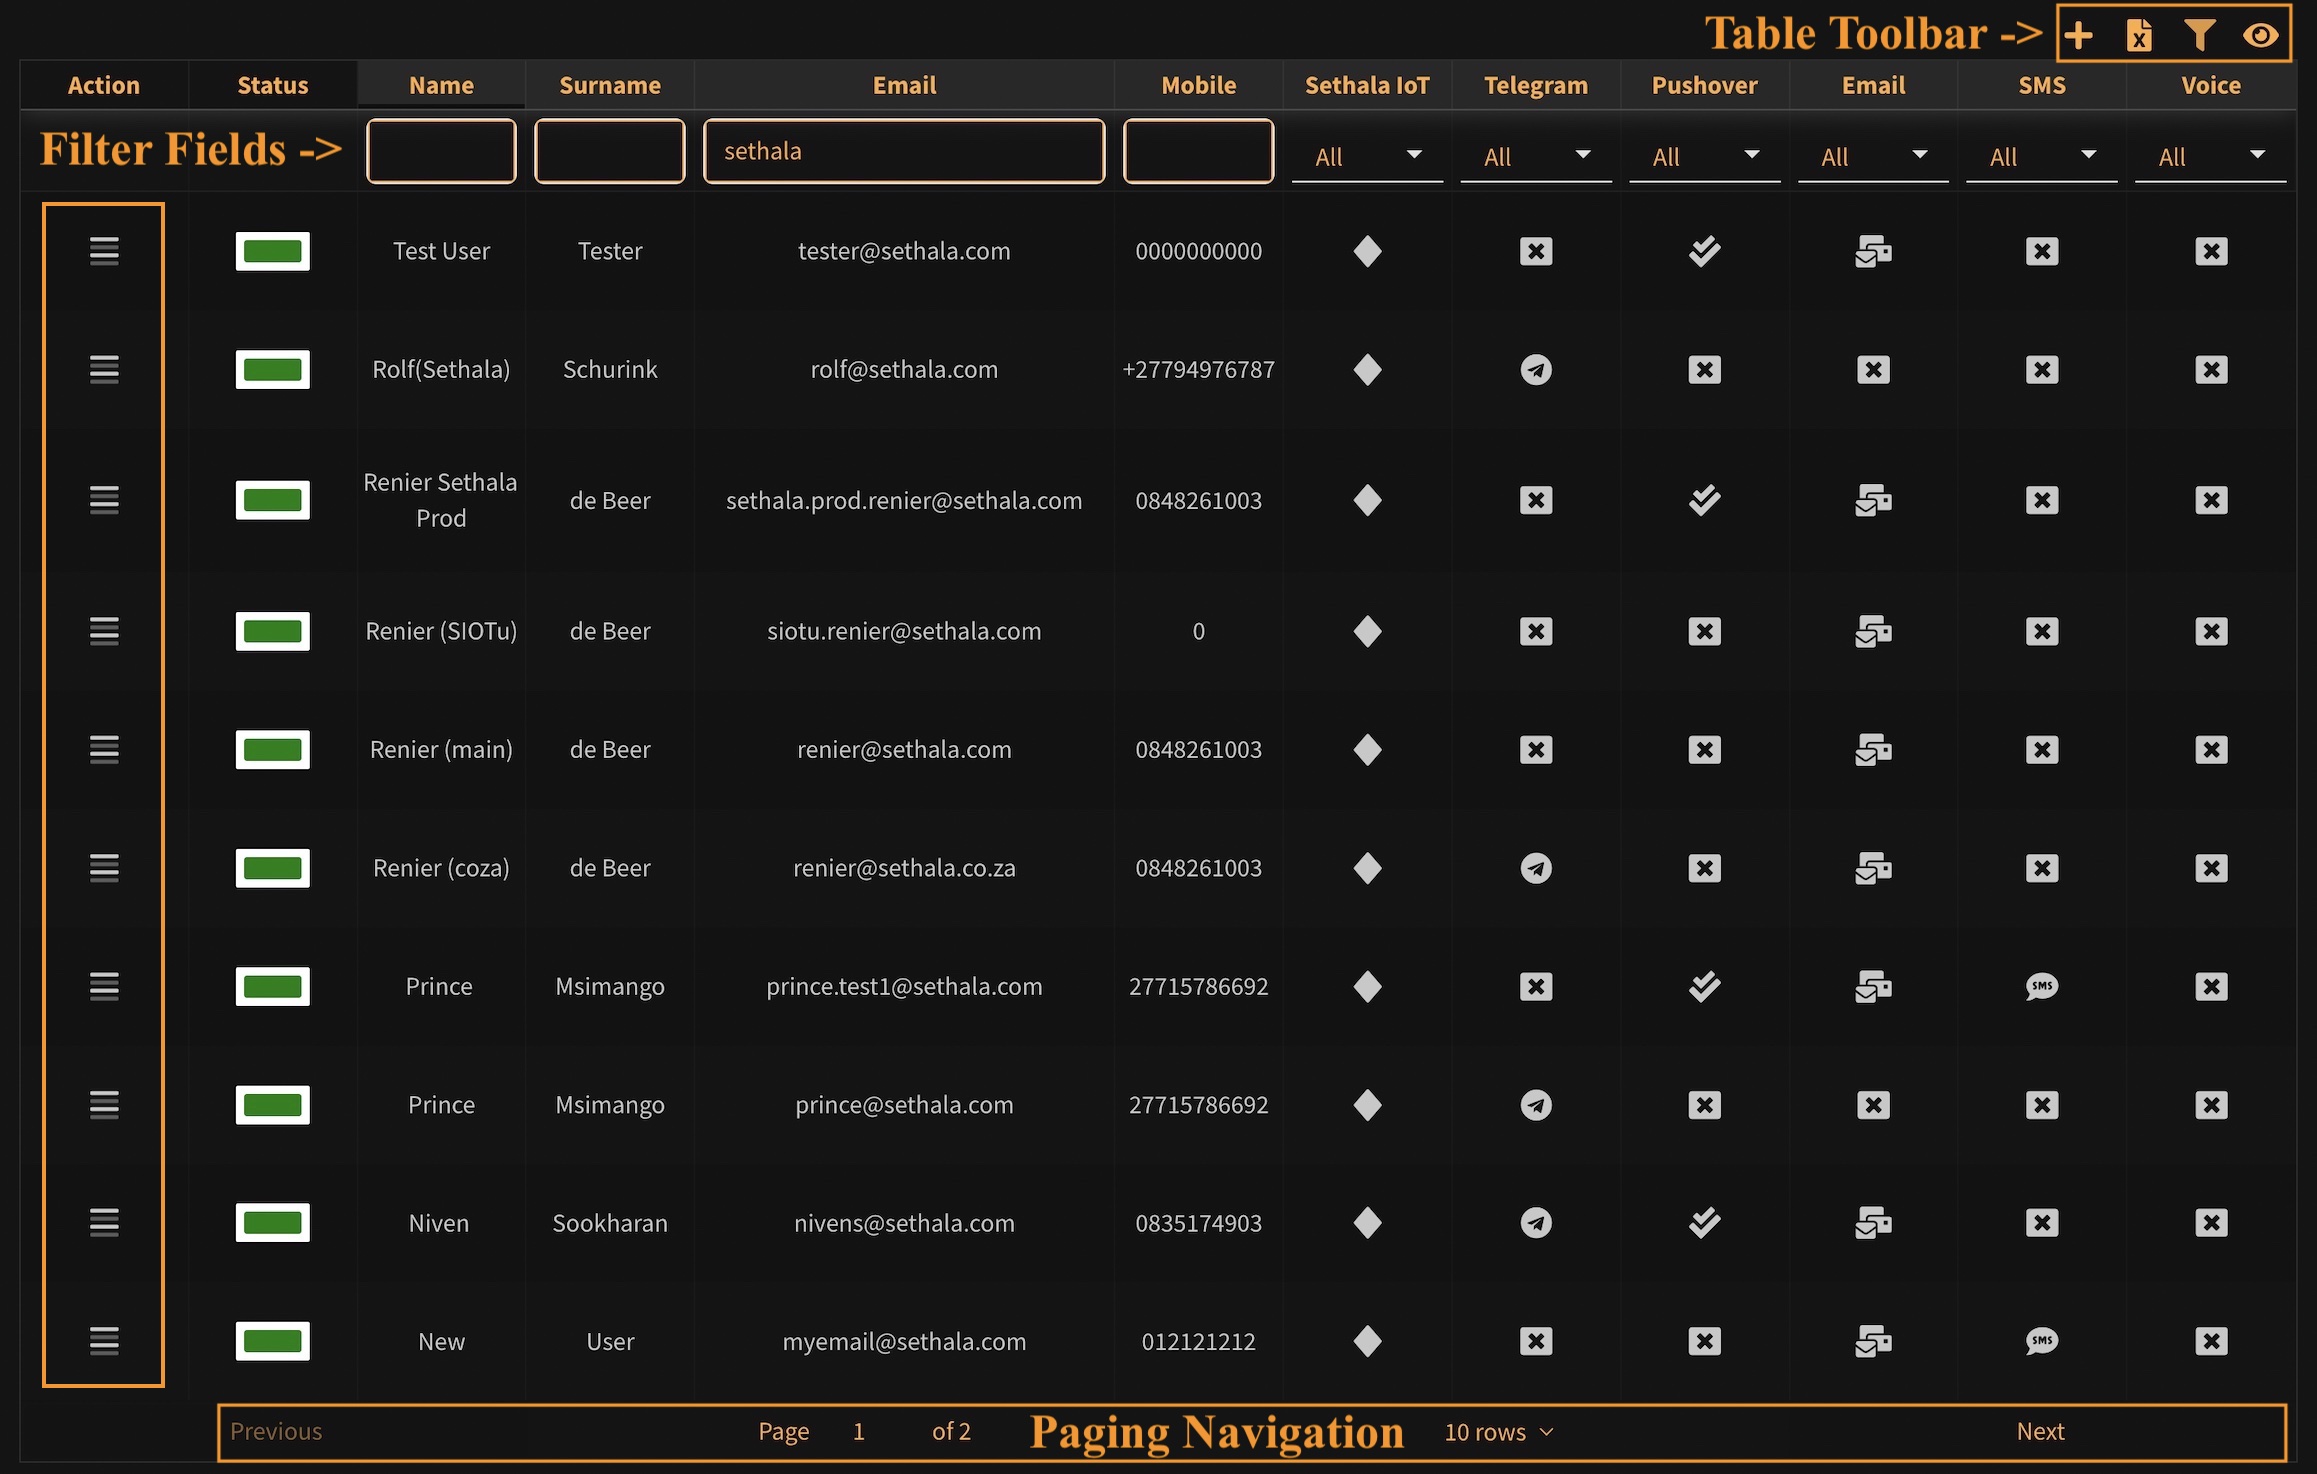
¶ List, filter and locate Contacts
- Use the table tools to manage data in the table.
- Table Toolbar → Available action buttons in the toolbar: Add, Export, Enable / Disable Filter, Enable / Disable visible Fields.
- Table Header → Clicking a highlighted header will sort the data ascending; clicking again will sort descending.
- Filter Fields → After enabling the filter use one or more of the filters below each header to locate / filter the data dynamically.
- Paging Navigation → Use the paging navigation section to page through record sets or jump to a specific page.
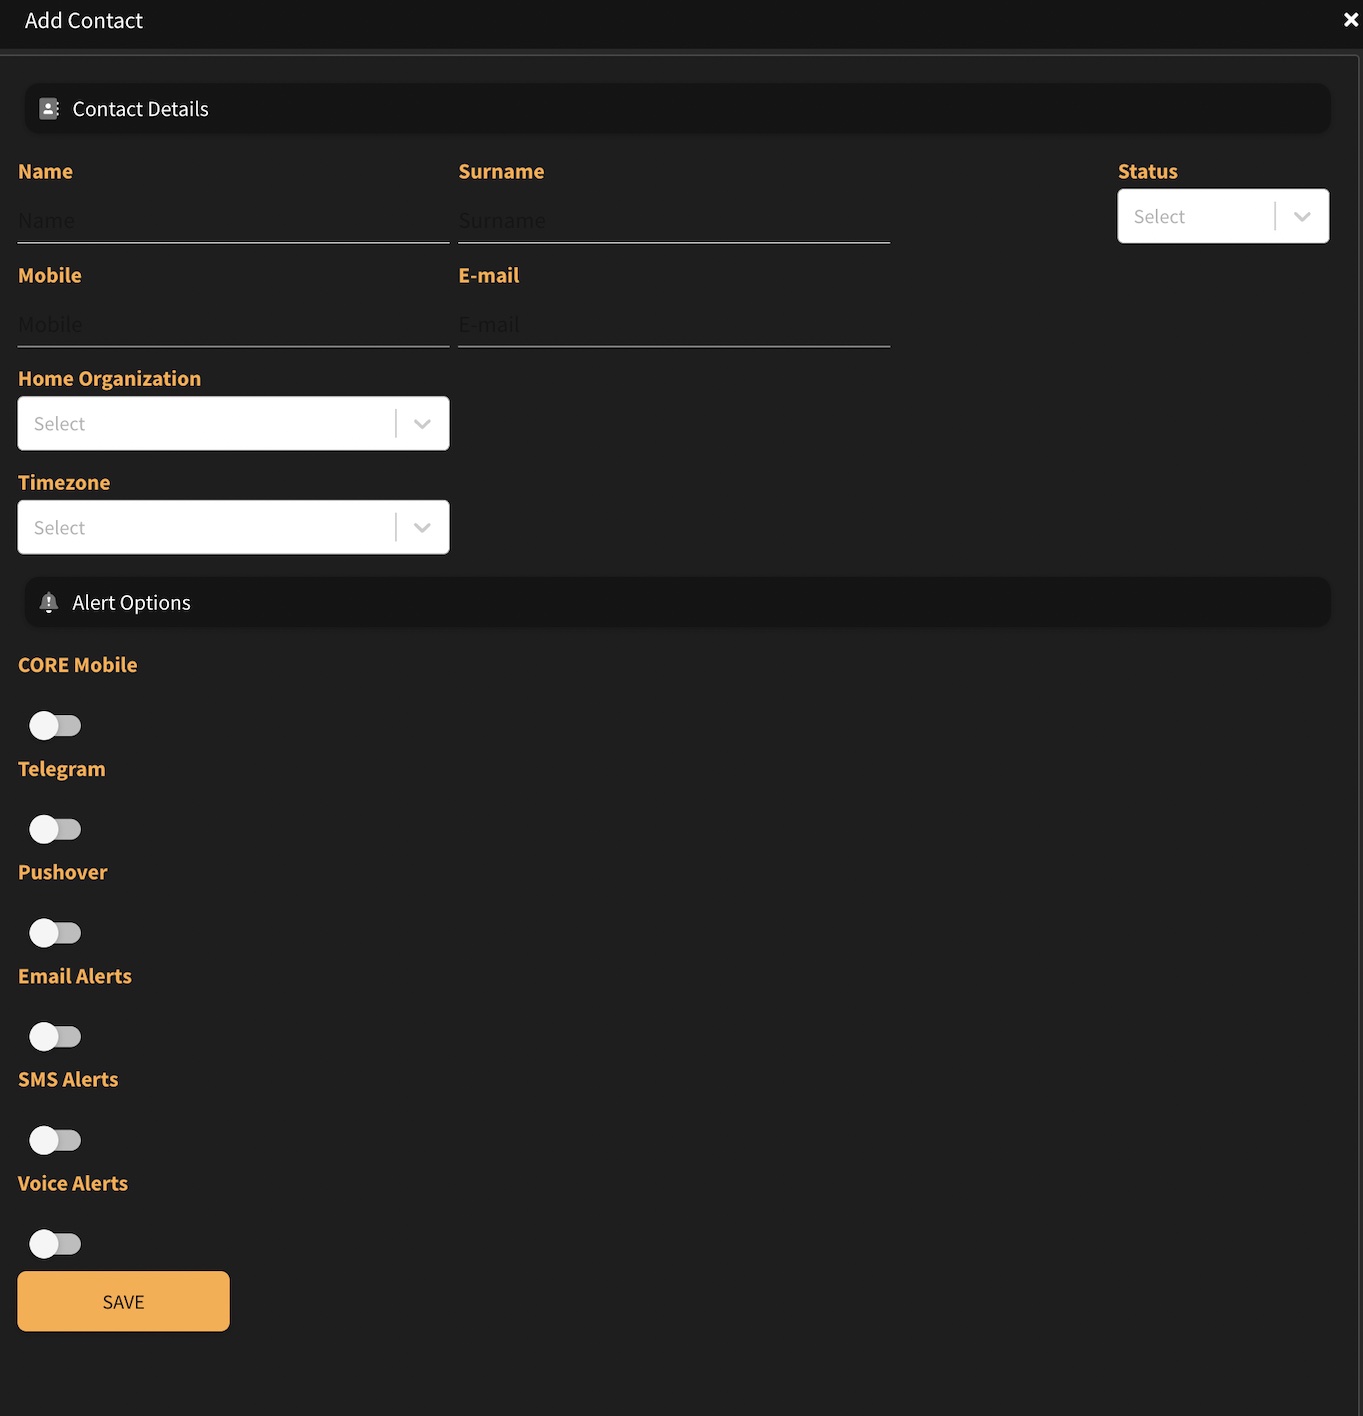
¶ Add Contact
Click the add (+) button in the Table Toolbar to open the add contact form. Ensure accurate information is entered in each field as this information will be used by the Platform when sending contacts notification alerts and/or scheduled reports. Complete each of the fields as follow:
- Name: Contact's First name.
- Surname: Contact's Surname / Last Name.
- Mobile: Contact's mobile number. Will be used for voice notifications if enabled.
- E-mail: Contact's e-mail address. Will be used for email communication.
- Home Organization: Select the Organization to link the Contact to.
- Timezone: Select the Contact's timezone as per his/her regional location.
- Alert Options: Enable each of the alert options you want to activate for the Contact.
¶ Update Contact
From the Action menu in line with the contact you wish to update, click the Update button to open the update form.
- Update contact information: Use the form to make changes to the contact information as required.
- Alert Options → Configure each alert preference as needed.
- Telegram: Enable / Disable Telegram alert notifications.
- If you are new to Telegram, please ensure to first download the Telegram app, create a new Telegram account and sign-in to the Telegram app.
- New register your Telegram profile with the Sethala Telegram Bot by clicking the “Register Telegram” button. This will open a new window which will take you through the process of signing into Telegram and authorising the Sethala Telegram Bot by clicking the “start” button. Please ensure you follow the instructions carefully.
- After successful registration click the “Test Telegram” button. The Platform will send a test notification to your Telegram app. For more information please visit https://telegram.org.
- Pushover: Enable / Disable Pushover alert notifications. For more information please visit https://pushover.net.
- Email Alerts: Enable / Disable e-mail alert notifications.
- SMS Alerts: Enable / Disable SMS alert notifications. Please note tokens are required.
- Voice Alerts: Enable / Disable voice alert notifications. Please note tokens are required.
- Telegram: Enable / Disable Telegram alert notifications.
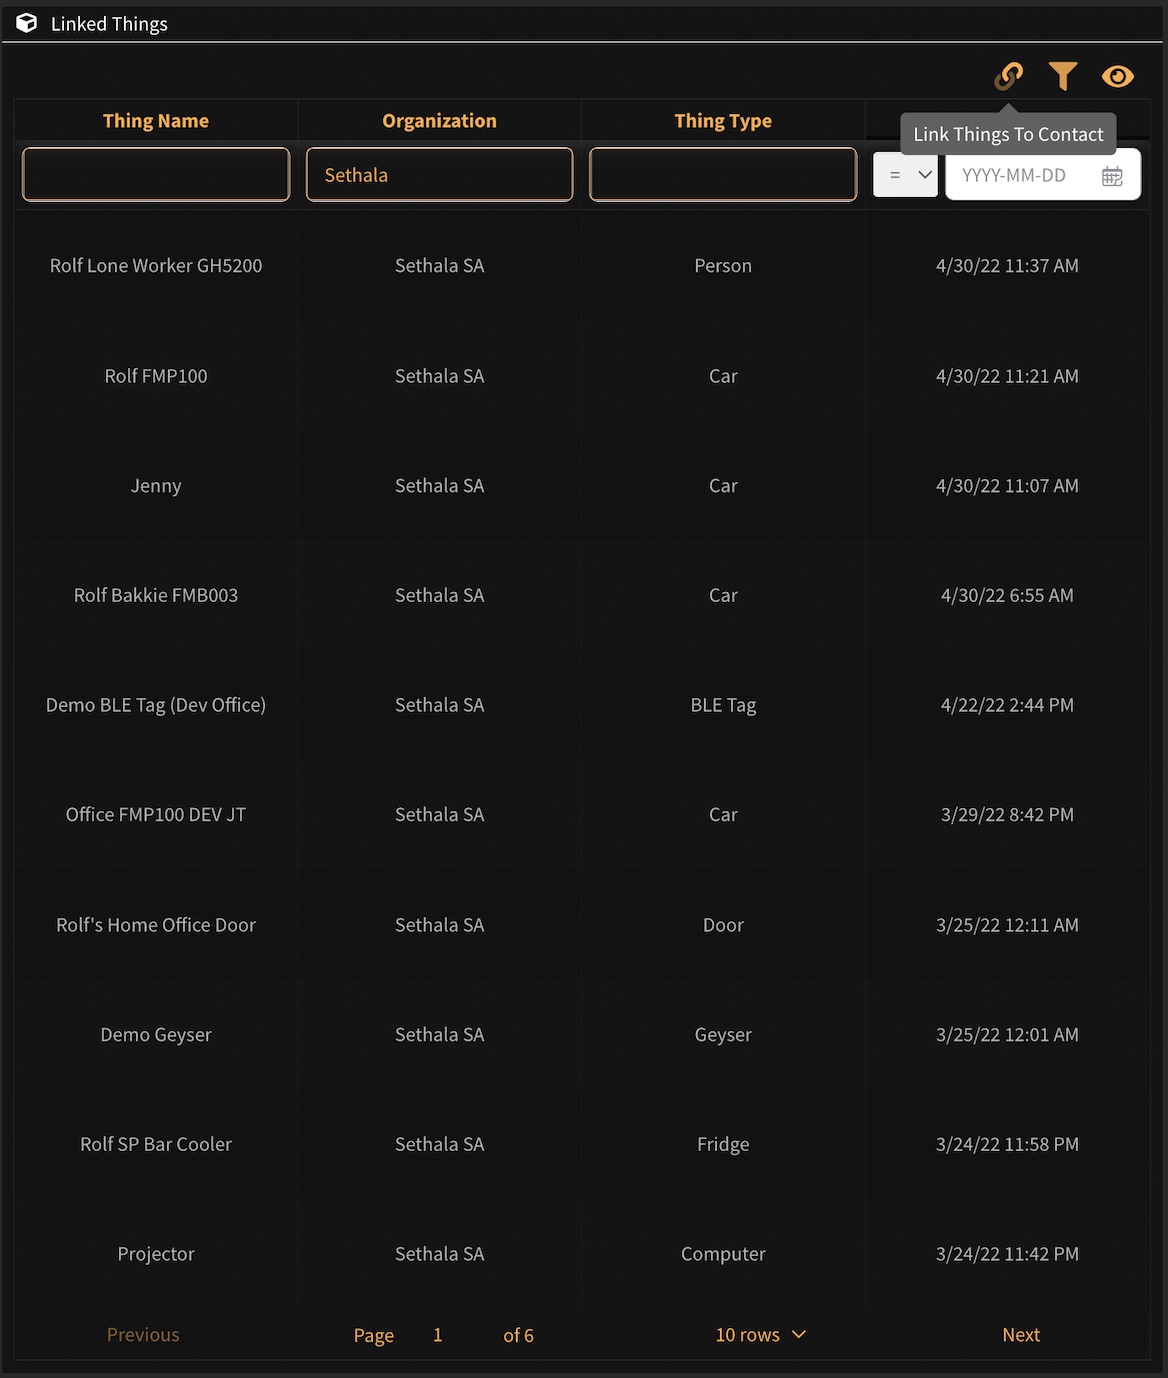
¶ Link a contact to Things
Contacts are notified of Alerts of their linked Things. If nothing is linked to a Contact, the will not receive any alerts. Contacts will therefore only receive Alerts for Things they are linked to.
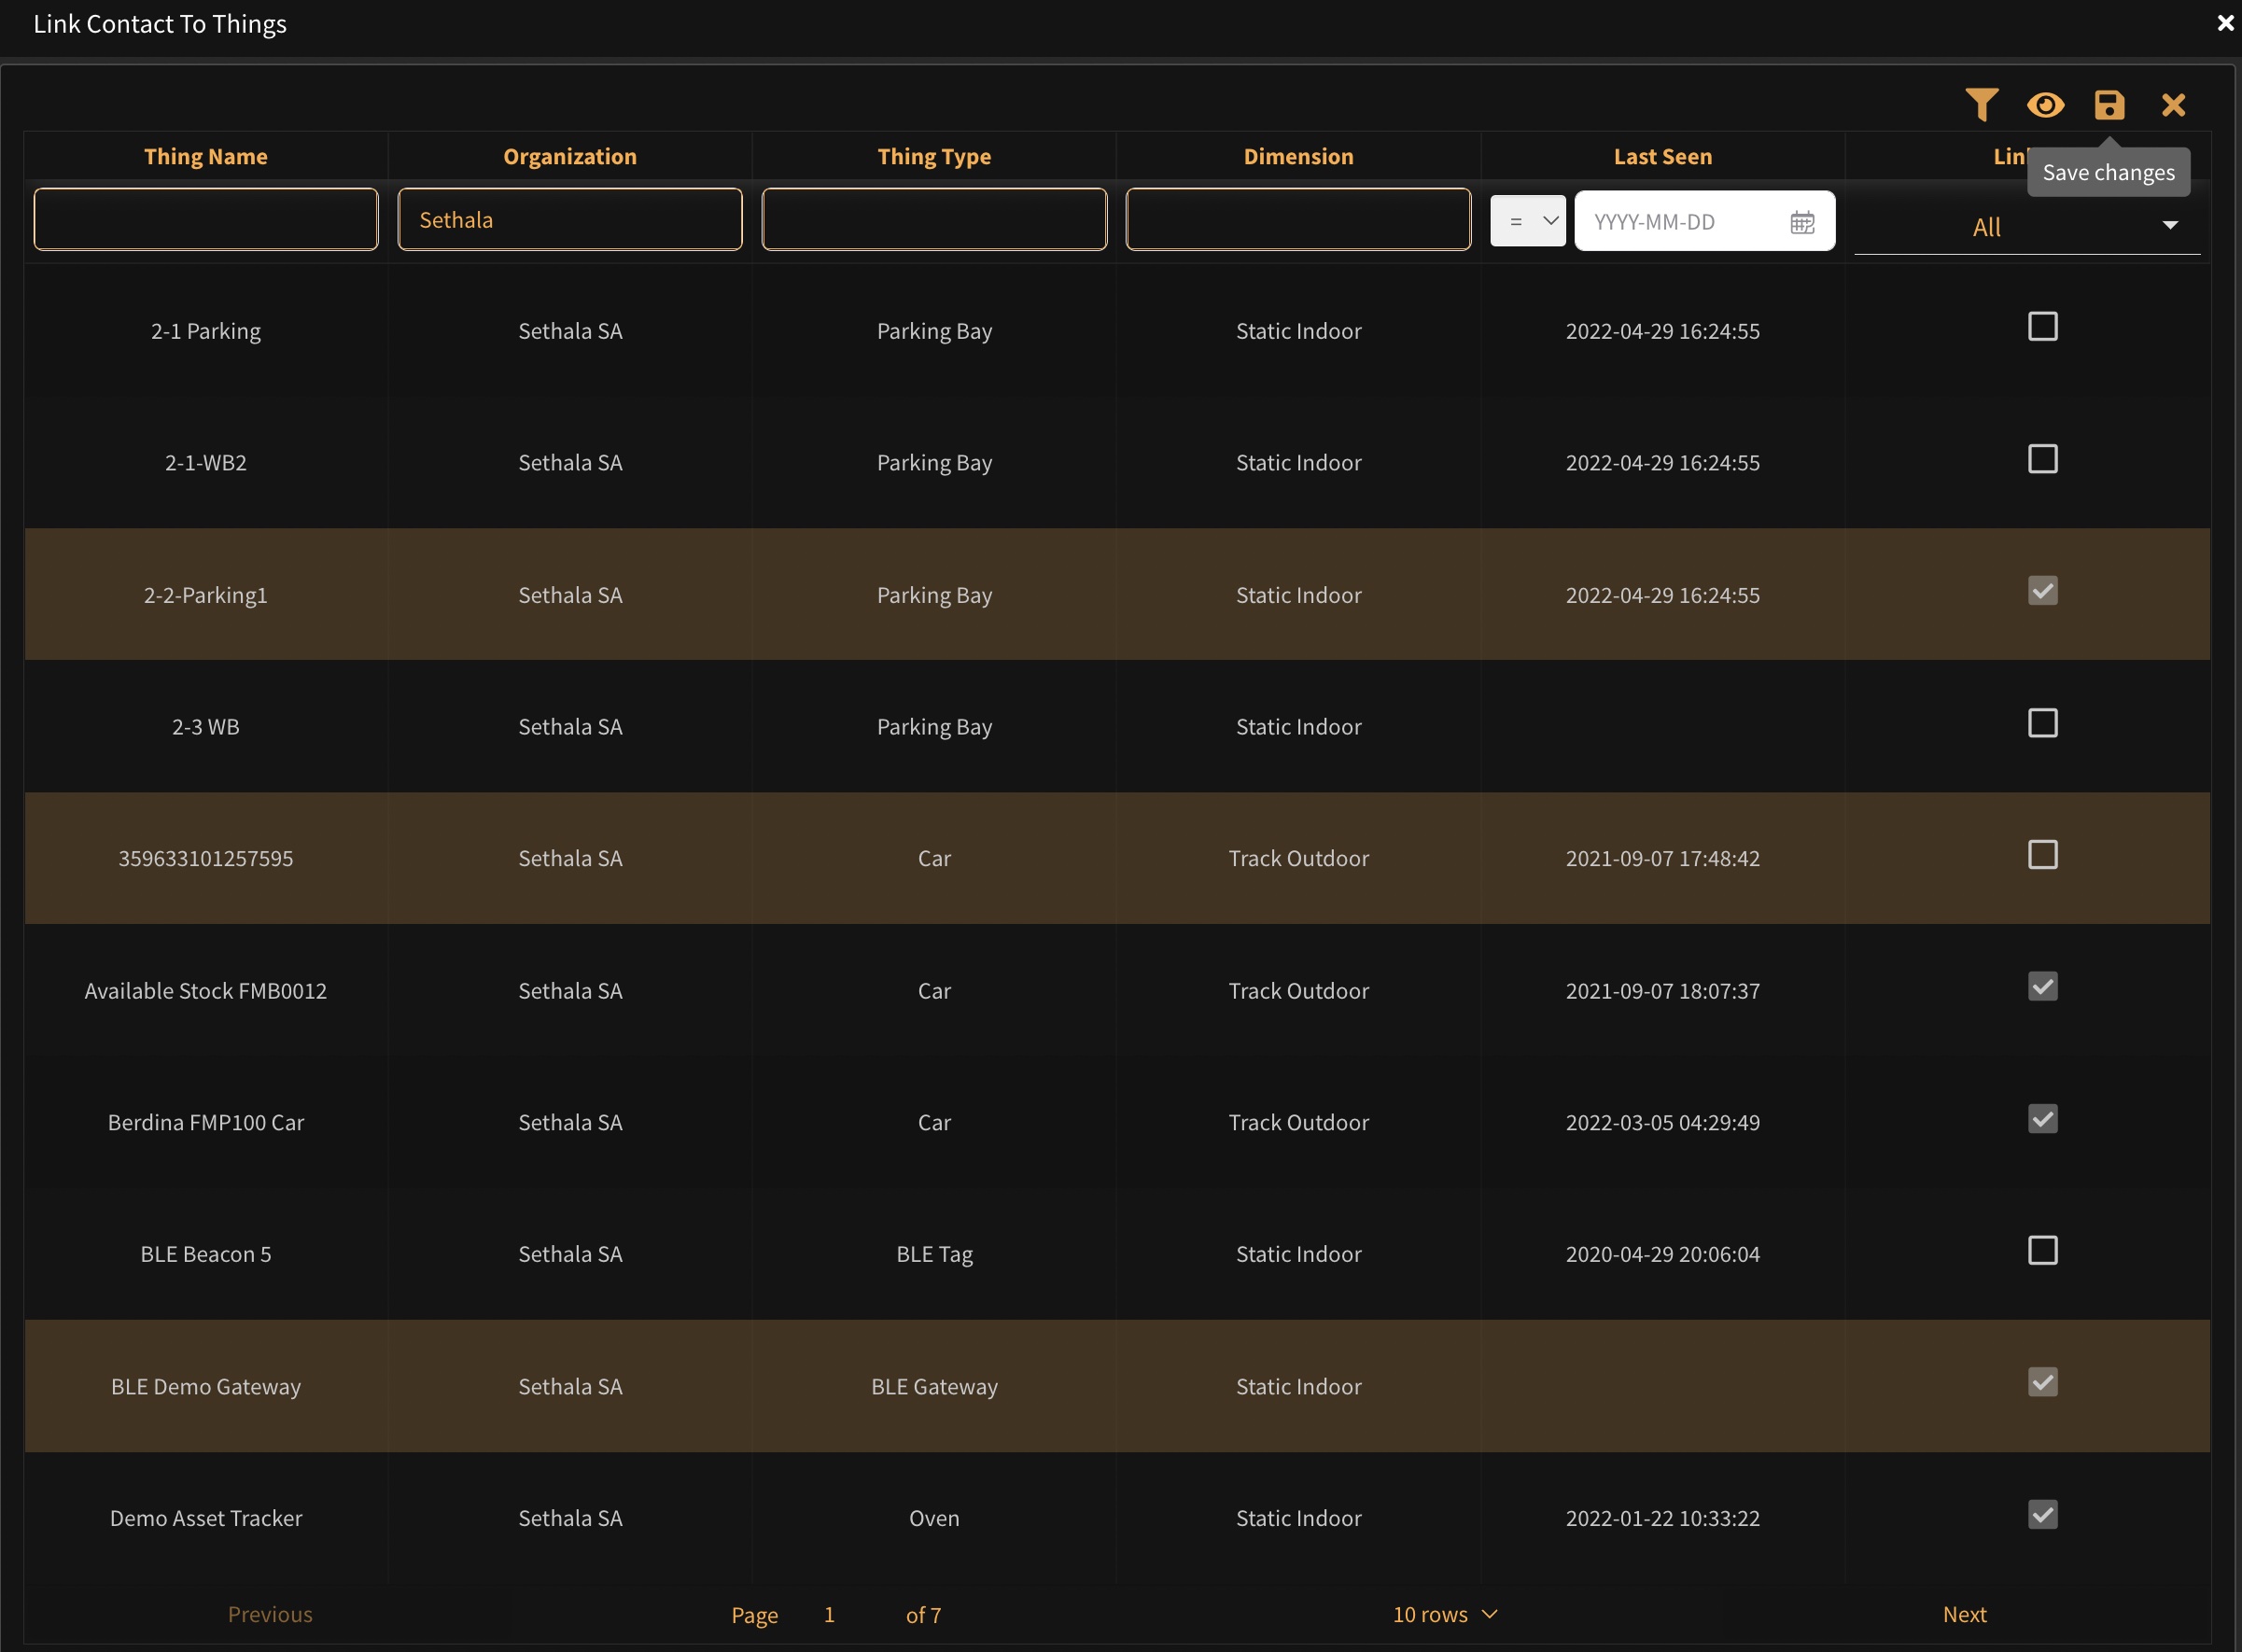
Use the table on the right to view the Things linked to the Contact and the action button in the table toolbar to open the table of link / unlink things.
Select the Thing(s) to be linked and click the save button in the table toolbar to store your changes.
¶ Favourites
This feature is used to quickly view important information from Things and Devices marked as Favourite in the Things and/or Devices modules.
¶ Locate & Monitor
Use this section to view location and sensor data of Things.
¶ Map
The map feature shows the latest geolocation position and other sensor data reported by Devices attached to all your Things on a geographical map. Using the build in map tools you can quickly track down the location of your Things, pan the map, zoom in/out on the map or search for a specific Thing.
¶ Outdoor Track
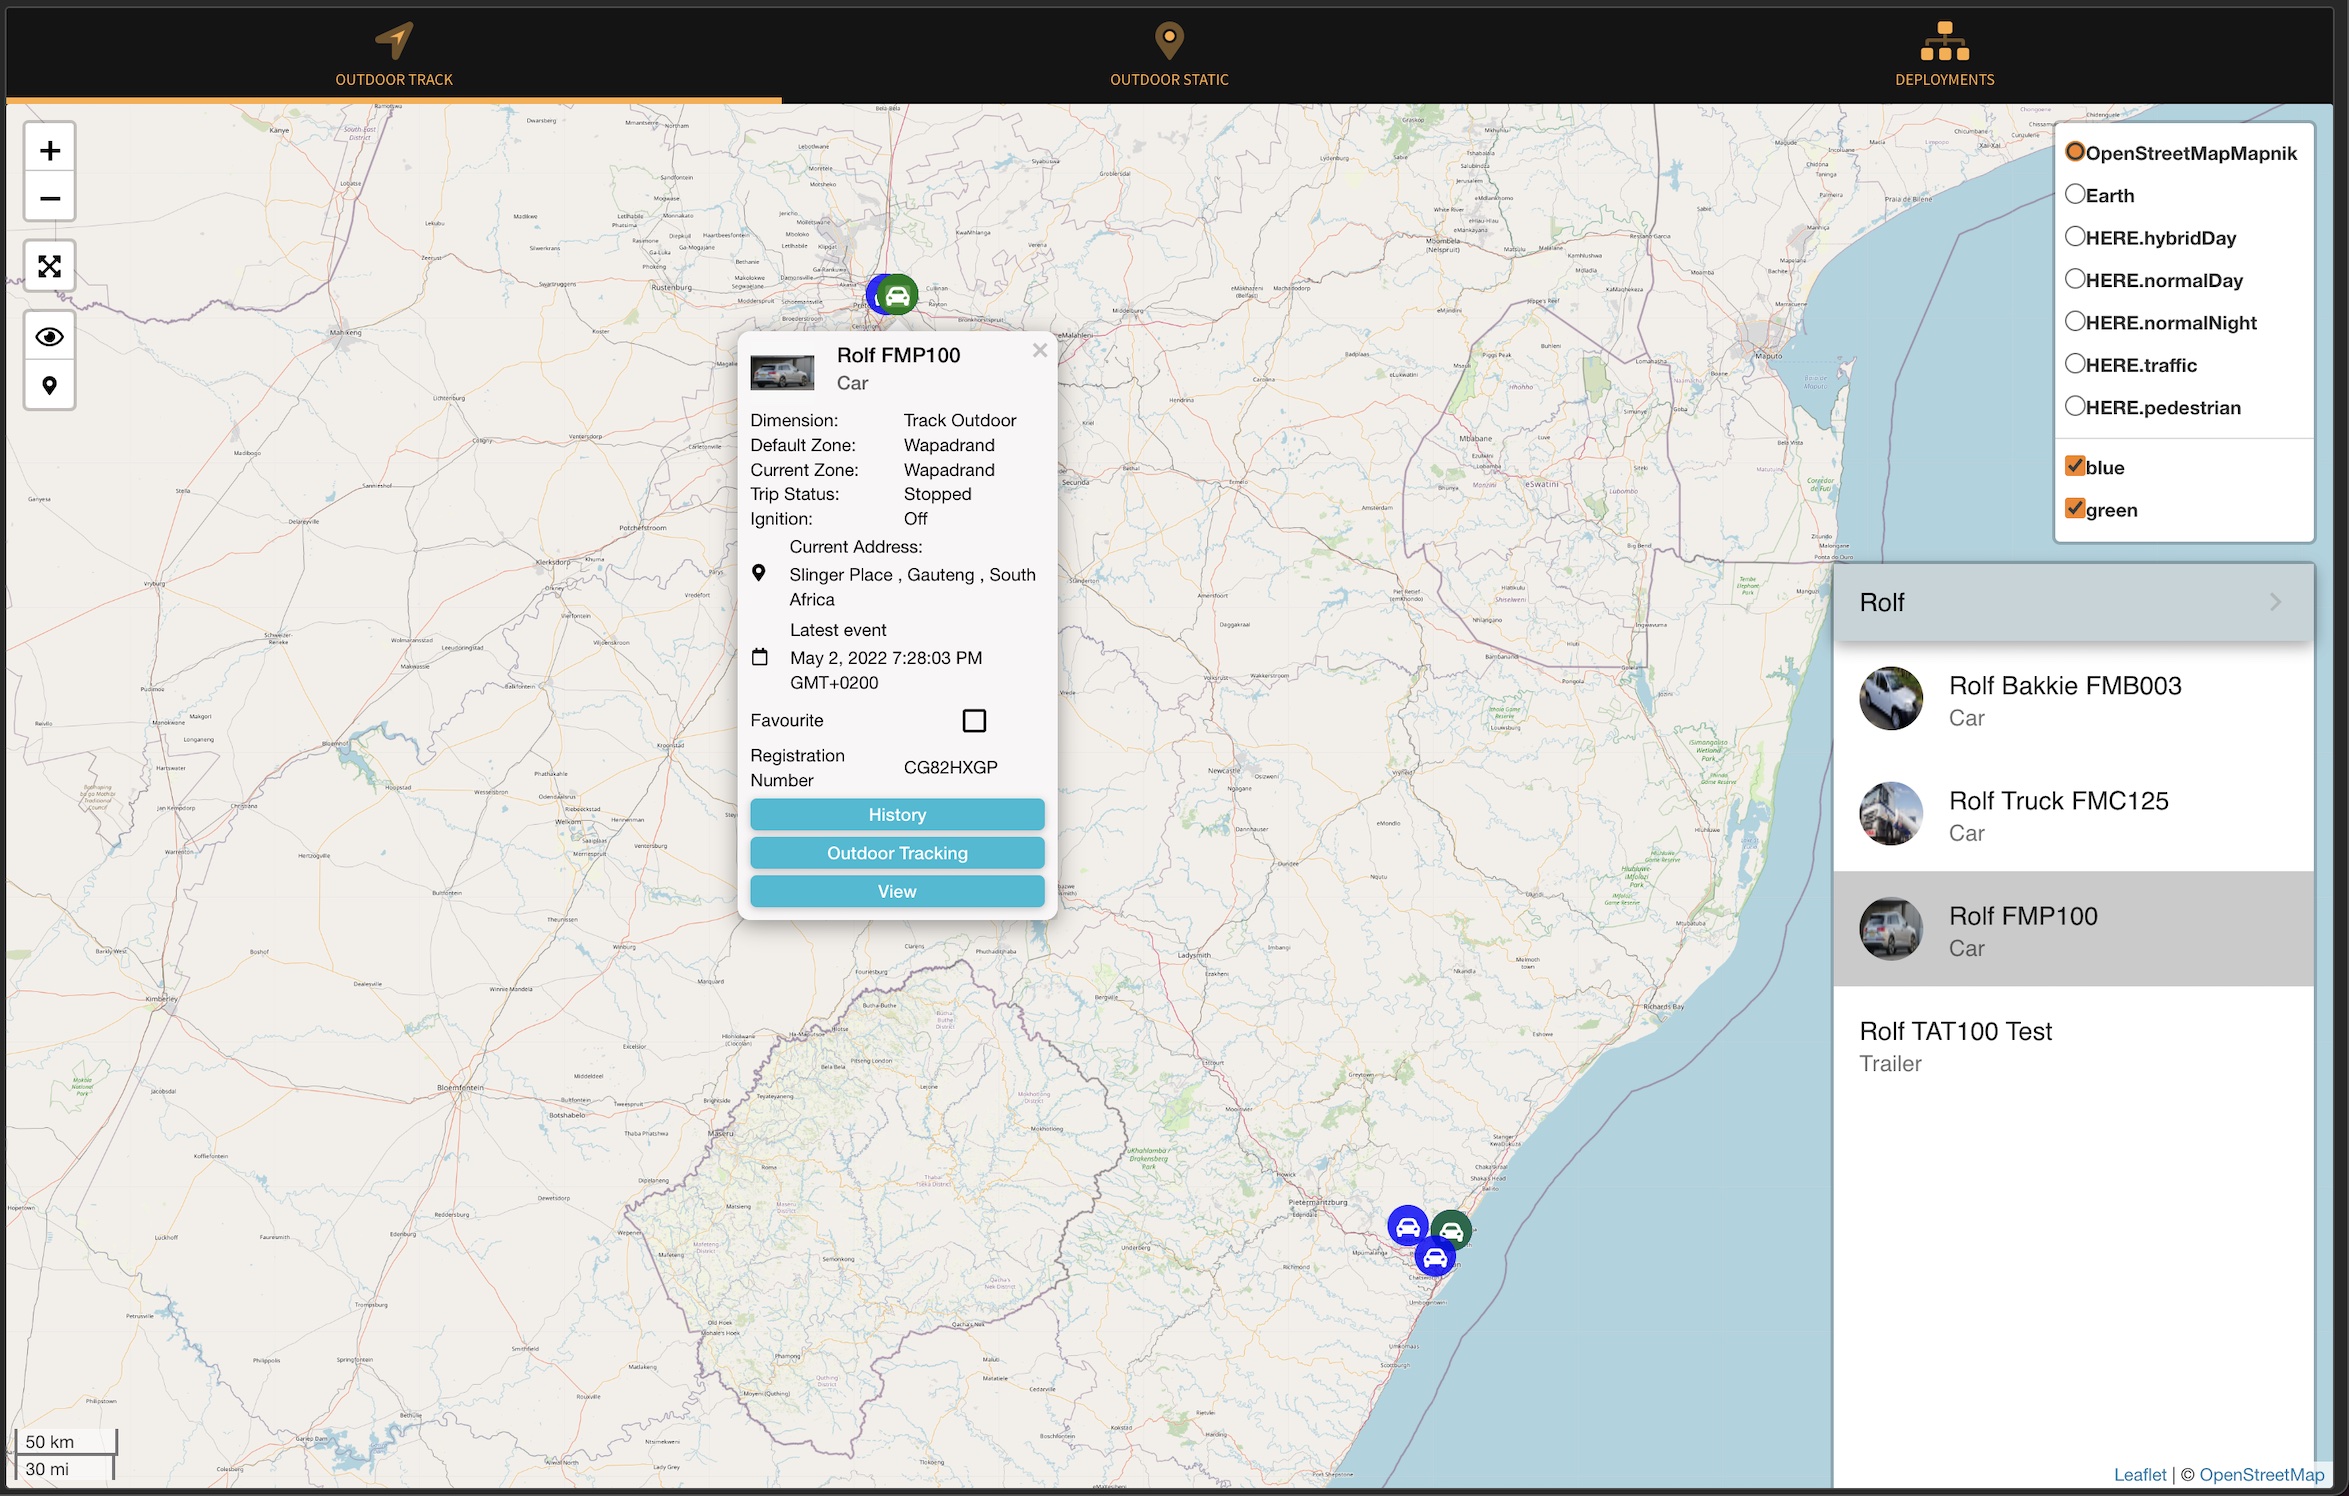
Furthermore, selecting a Thing provides shortcuts to:
¶ History
View historical movement/trip data. Change the date range by setting the filter in the table as indicated.
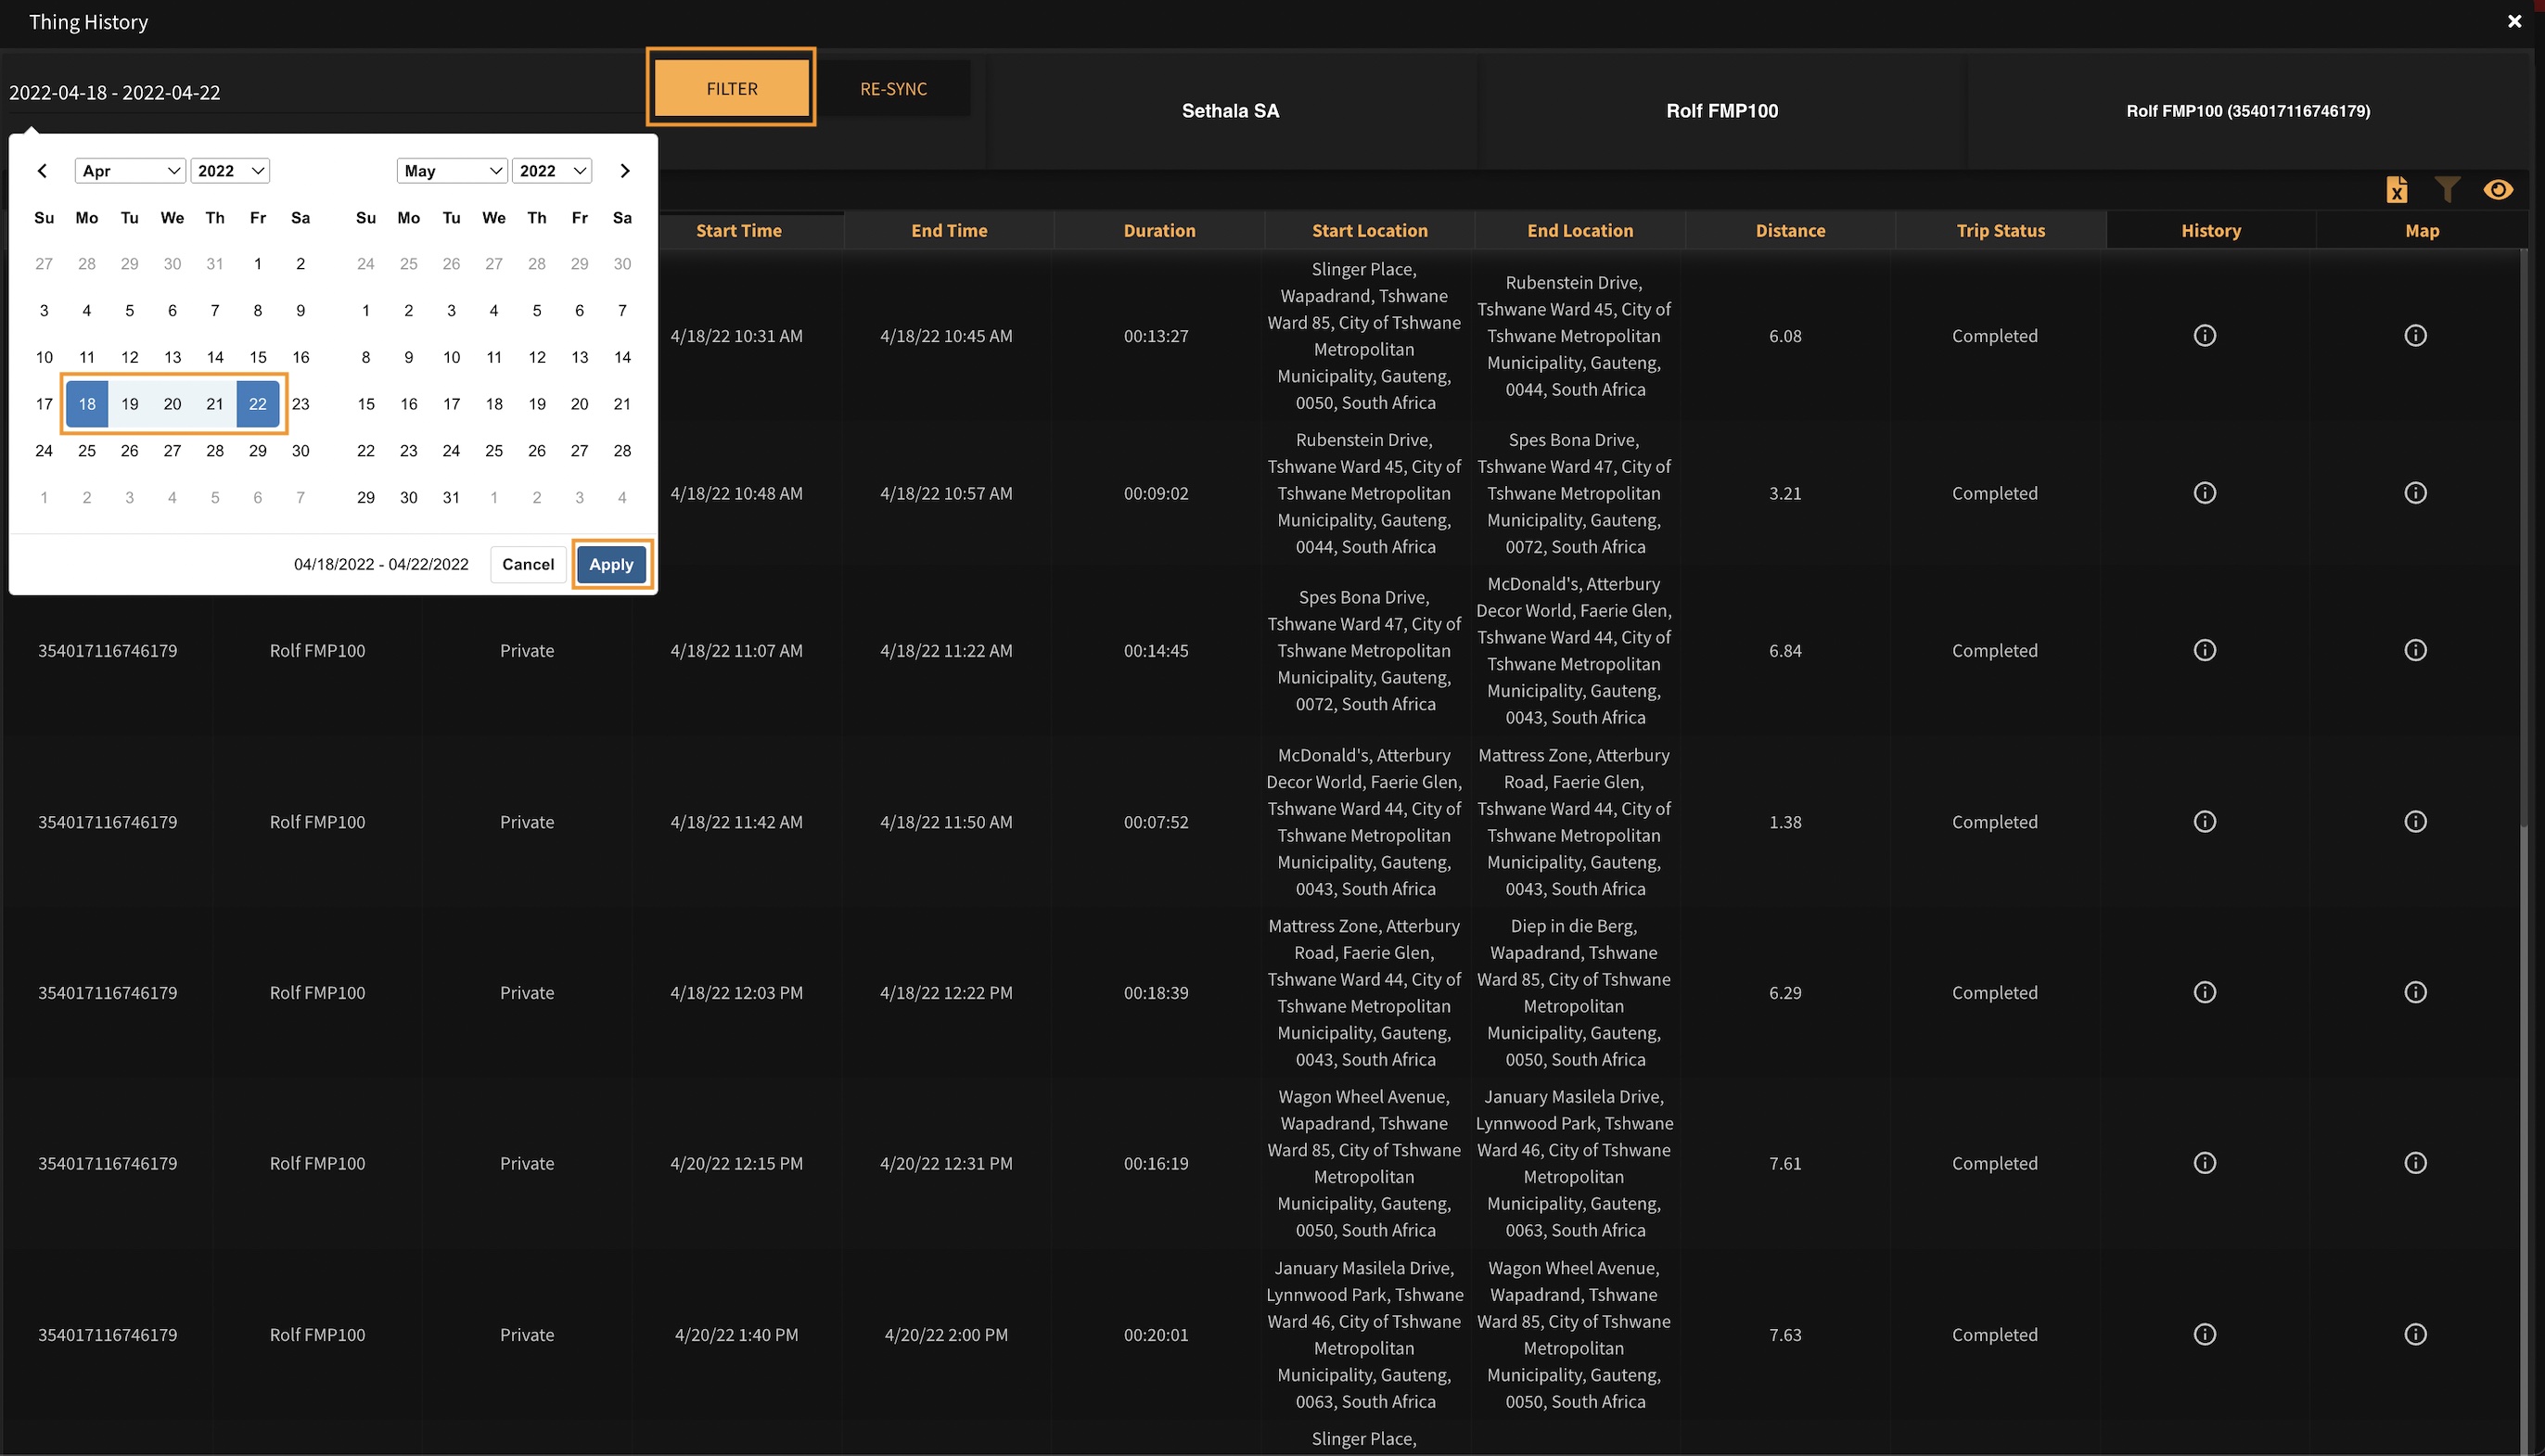
- Data columns:
- Device ID: The unique IMEI of the device which produced the data.
- Thing: The label of the Thing associated with the data.
- Trip Type: Type of trip registered. Options are Private and Business.
- Start Time: Start time of the trip.
- End Time: End time of the trip.
- Duration: Trip duration in HH:MM:SS.
- Start Location: Starting location of the trip.
- End Location: End location of the trip.
- Distance: Total distance recorded for the trip.
- Trip Status: Last reported trip status. Options are In Trip and Completed.
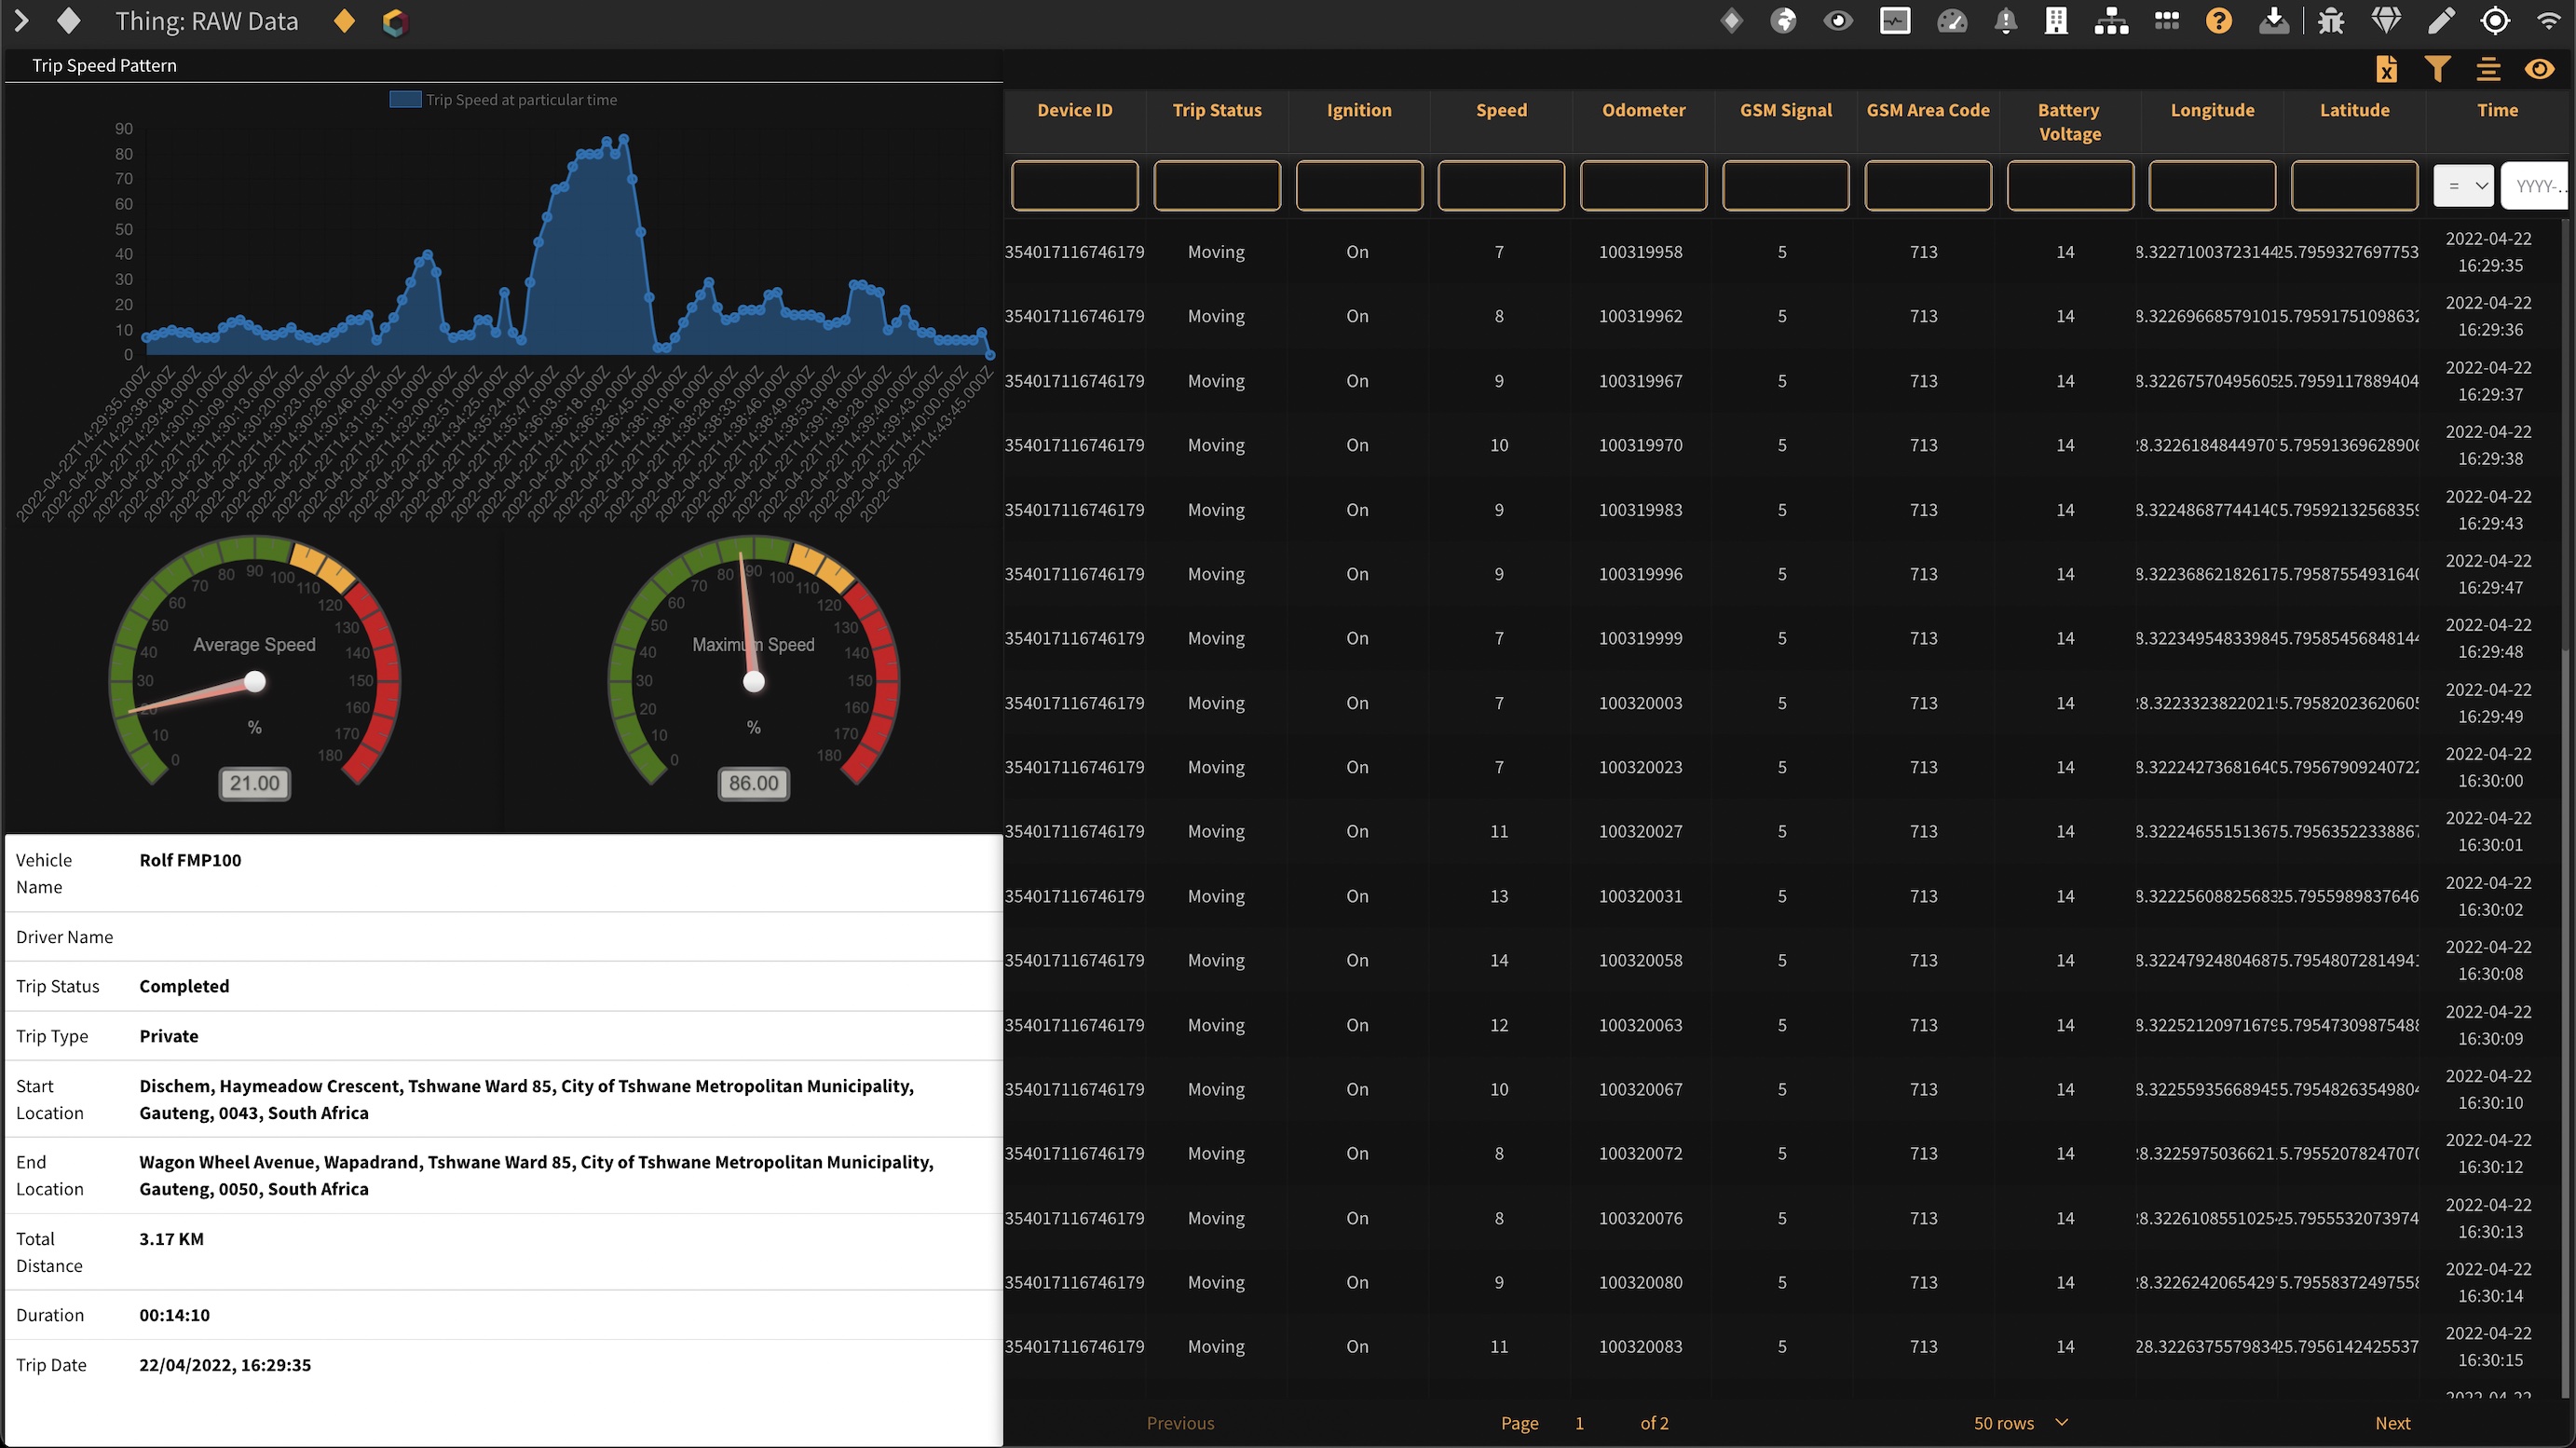
- Button1: RAW → Open a table with the RAW data for the selected trip.
- Trip Speed Pattern: Indicates the speed recorded over time for the selected trip.
- Average Speed: Shows the average speed for the selected trip.
- Maximum Speed: Shows the maximum speed for the selected trip.
- Thing Information: Shows various Thing information including summary of the selected trip.
- Table: Note the RAW data can be filtered, sorted and exported using the table tools in the table toolbar.
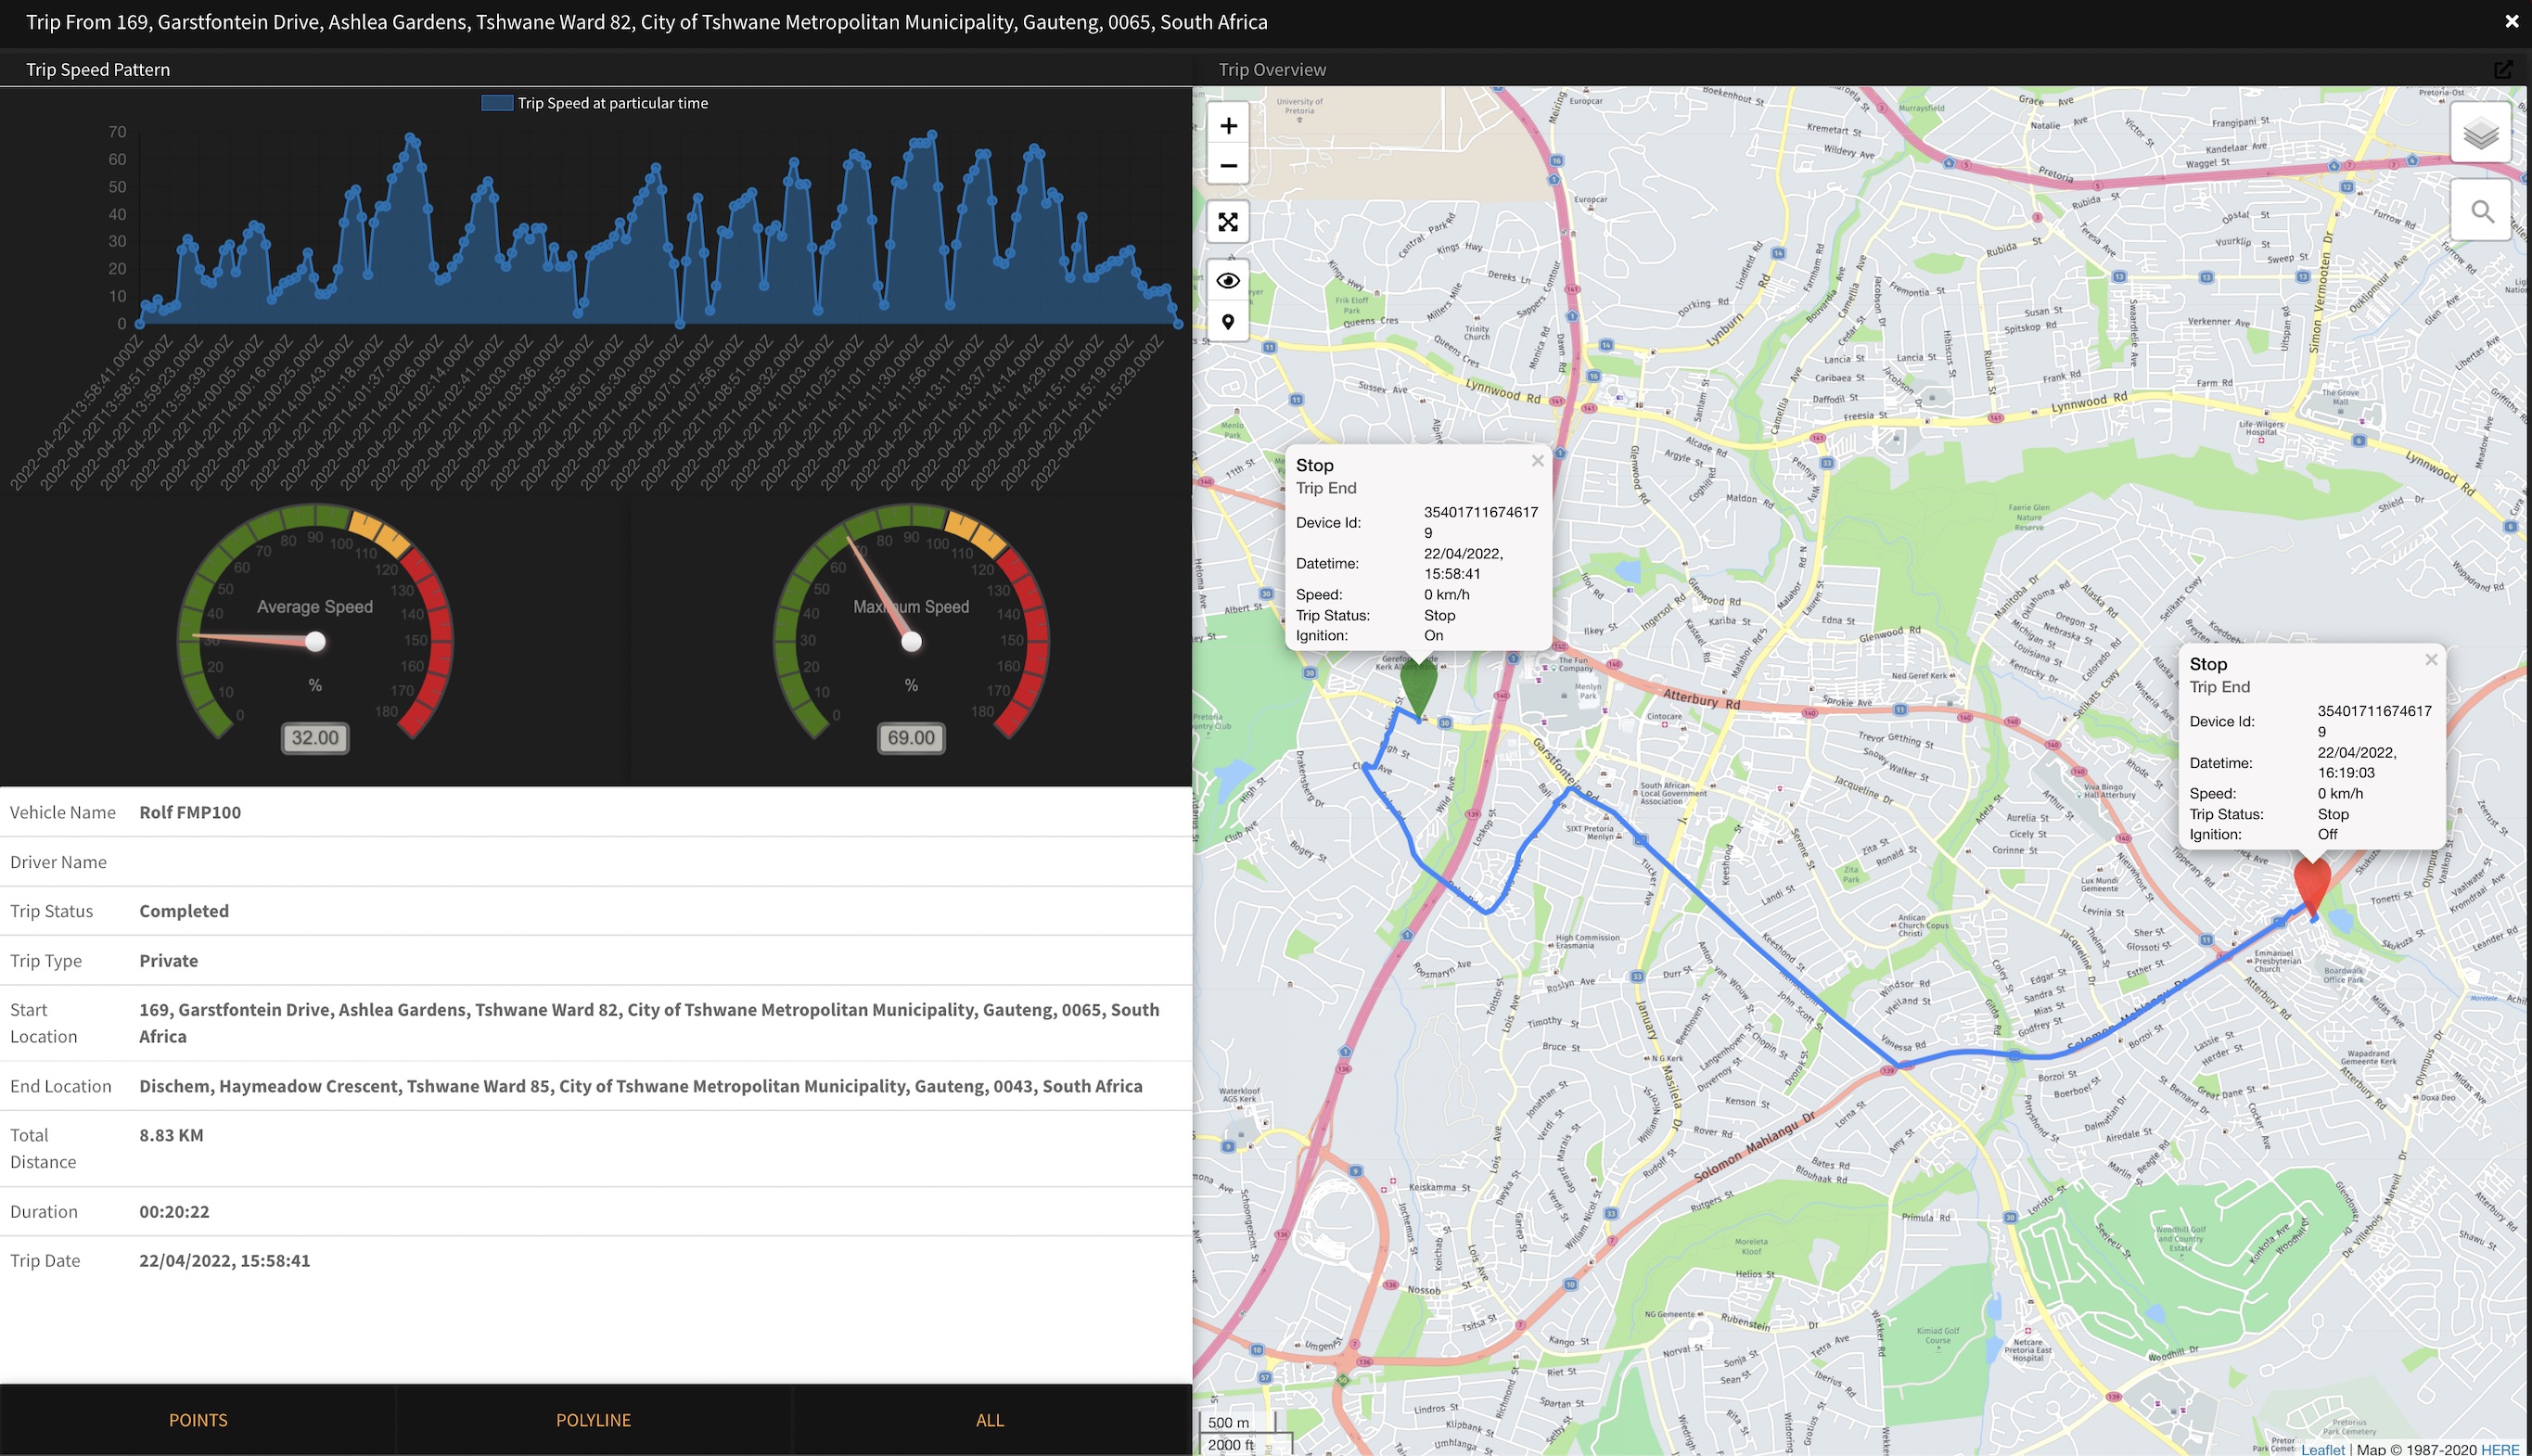
- Button2: Map → Open a map widget to view the trip on a map.
- Trip Speed Pattern: Indicates the speed recorded over time for the selected trip.
- Average Speed: Shows the average speed for the selected trip.
- Maximum Speed: Shows the maximum speed for the selected trip.
- Thing Information: Shows various Thing information including summary of the selected trip.
- Map: Map view of the selected trip.
¶ Outdoor Tracking
Shortcut to the Outdoor Zone Tracking feature.
¶ View
Access the Thing Overview feature to view and manage its relevant information.
¶ Overview
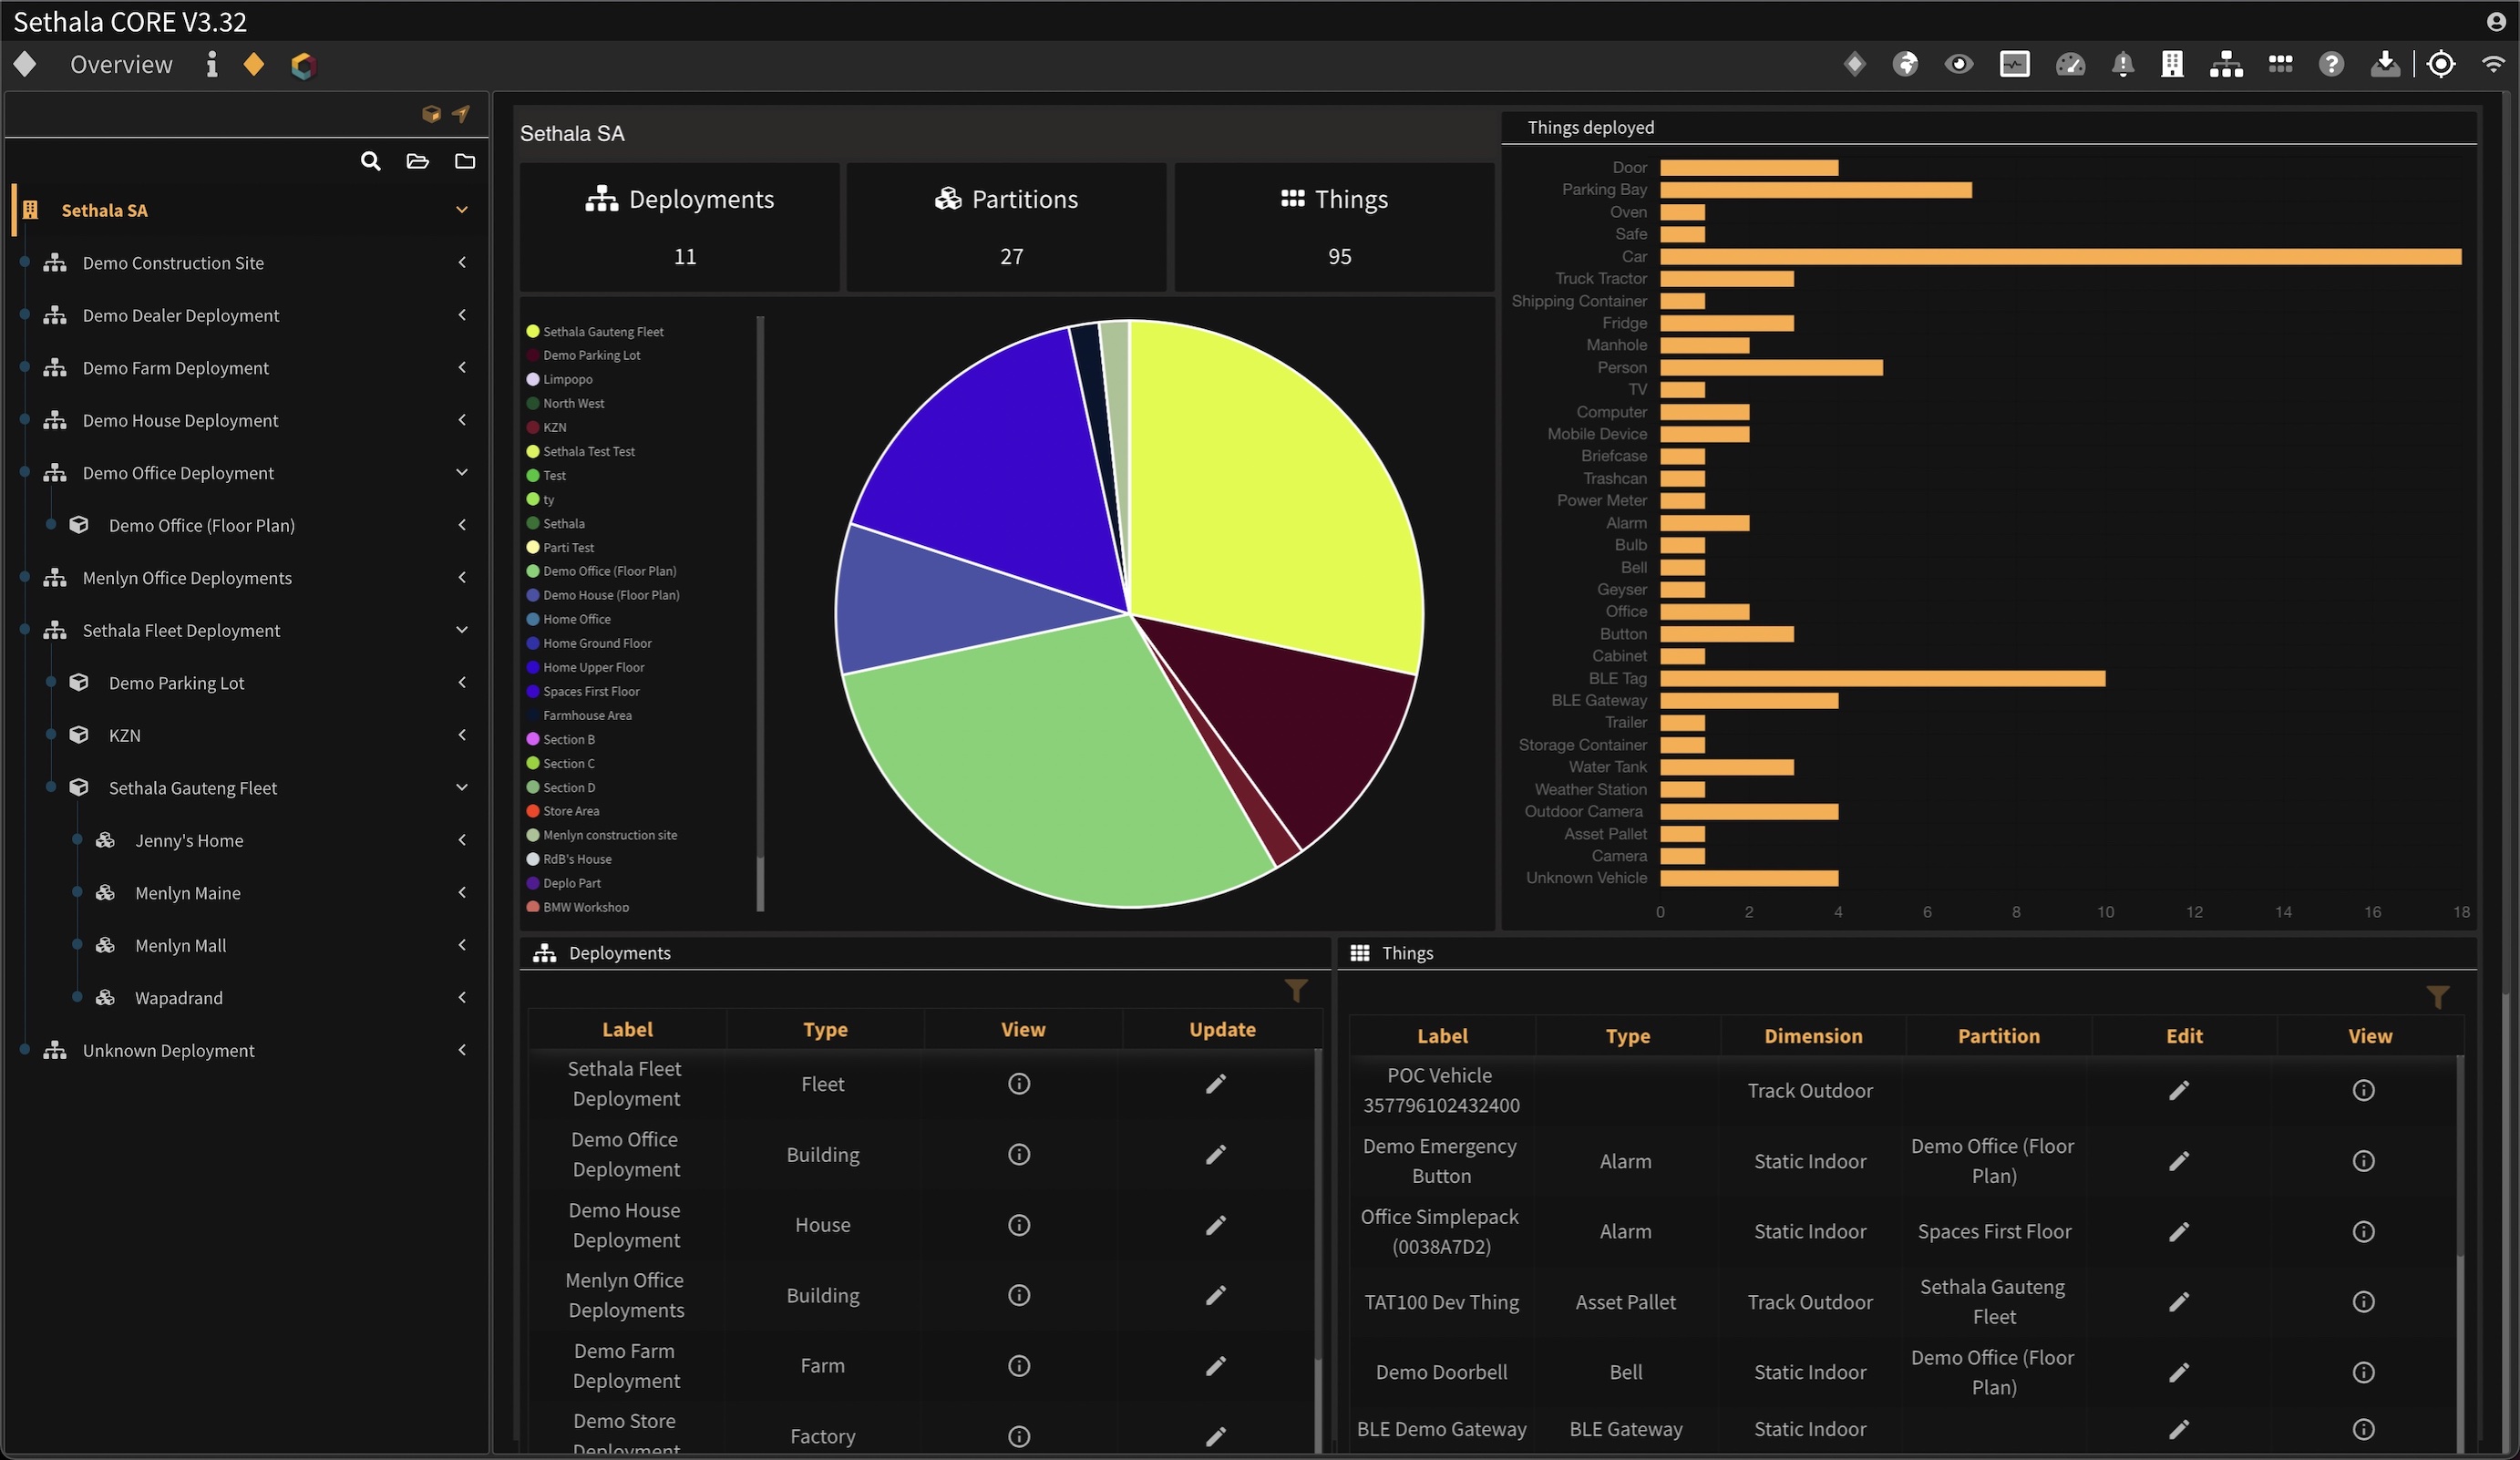
This feature shows an overview of all your configured Deployments and their associated Things. Use the tree on the left to browse for and locate a Deployment. Clicking on a different part of the tree drills down into the detail as follow:
- Organization
- Deployment
- Partitions
- Zones
- Things
- Zones
- Partitions
- Deployment
¶ Organization View
The Organization View reveals a summary of the Deployments and Things in the selected Organization. From here you are also able to access the Deployment View and Thing View of the selected entity.
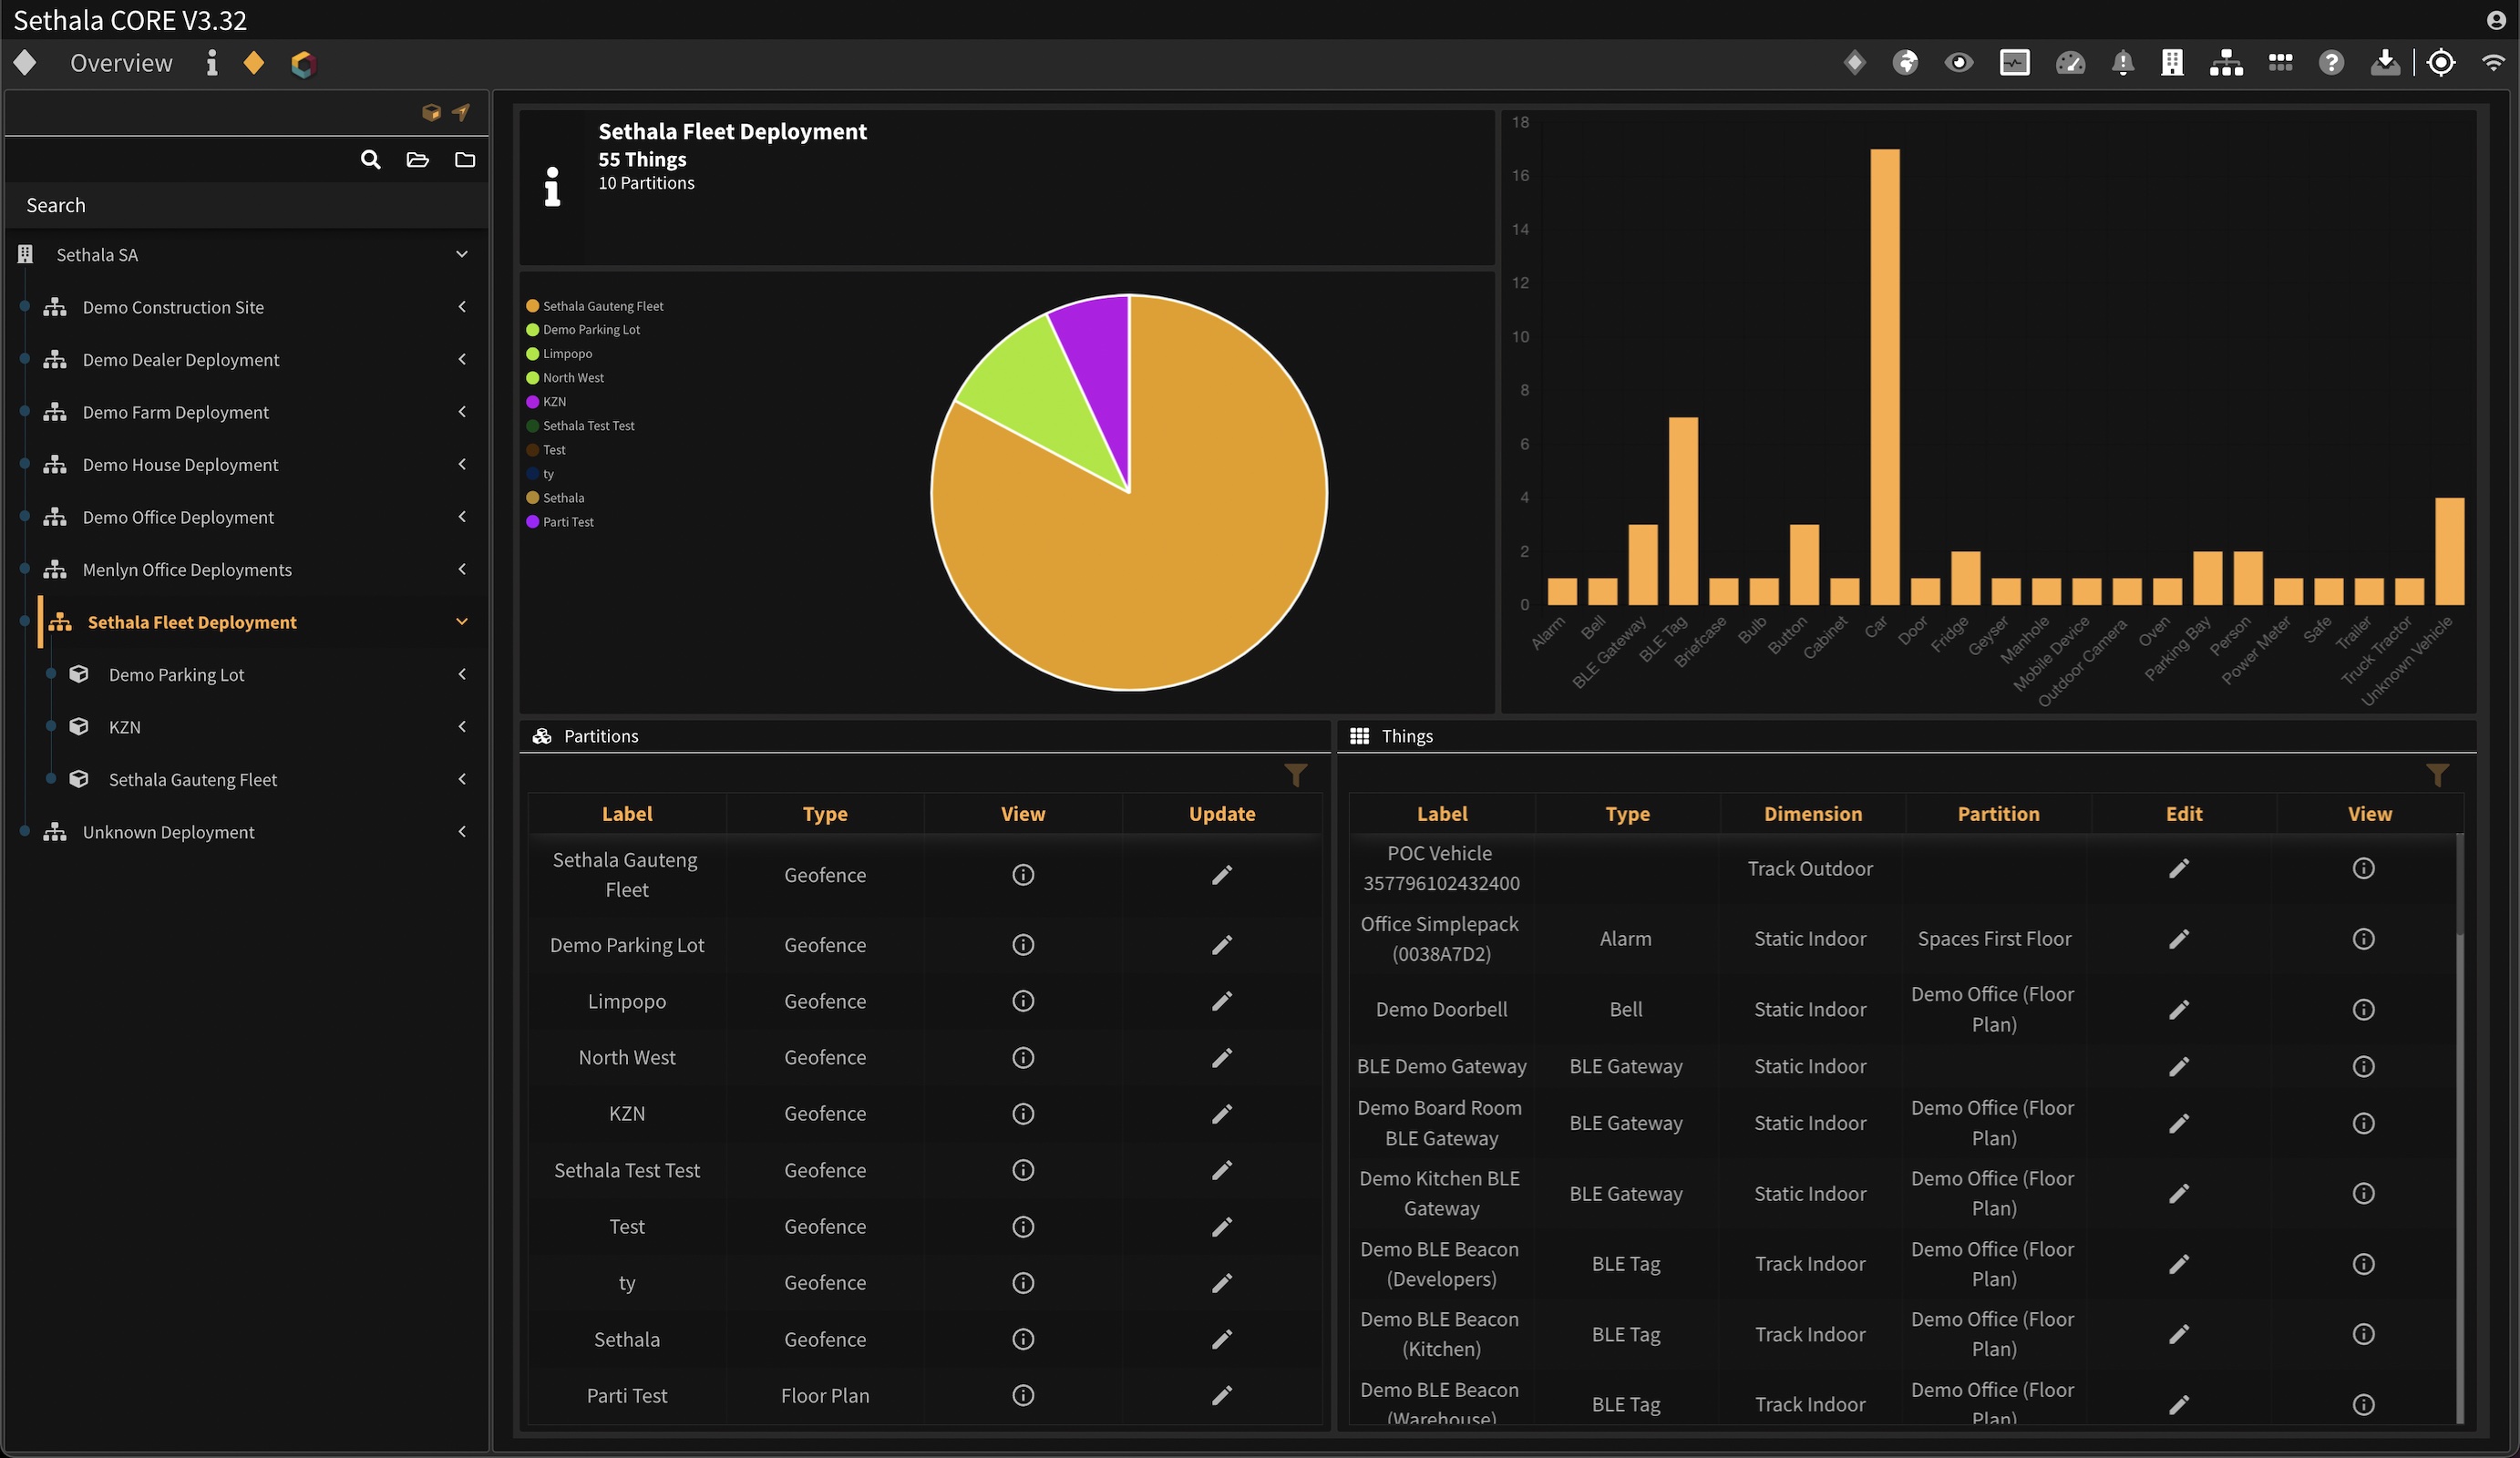
¶ Deployment View
The Deployment View reveals a summary of the Partitions and Things in the selected Deployment. From here you are also able to access the Partition View and Thing View of the selected Deployment.
¶ Partition View (Outdoor)
The Partition View reveals a map summary of the selected Partition geofence and the Things contained therein. From here you are also able to access the Thing View of a selected Thing.

¶ Zone View (Outdoor)
The Zone View reveals a map summary of the selected Zone geofence and the Things contained therein. From here you are also able to access the Thing View of a selected Thing.

¶ Partition View (Indoor)
The Partition View reveals a floor plan summary of the selected Partition and the Things contained therein. From here you are also able to access the Thing View of a selected Thing.
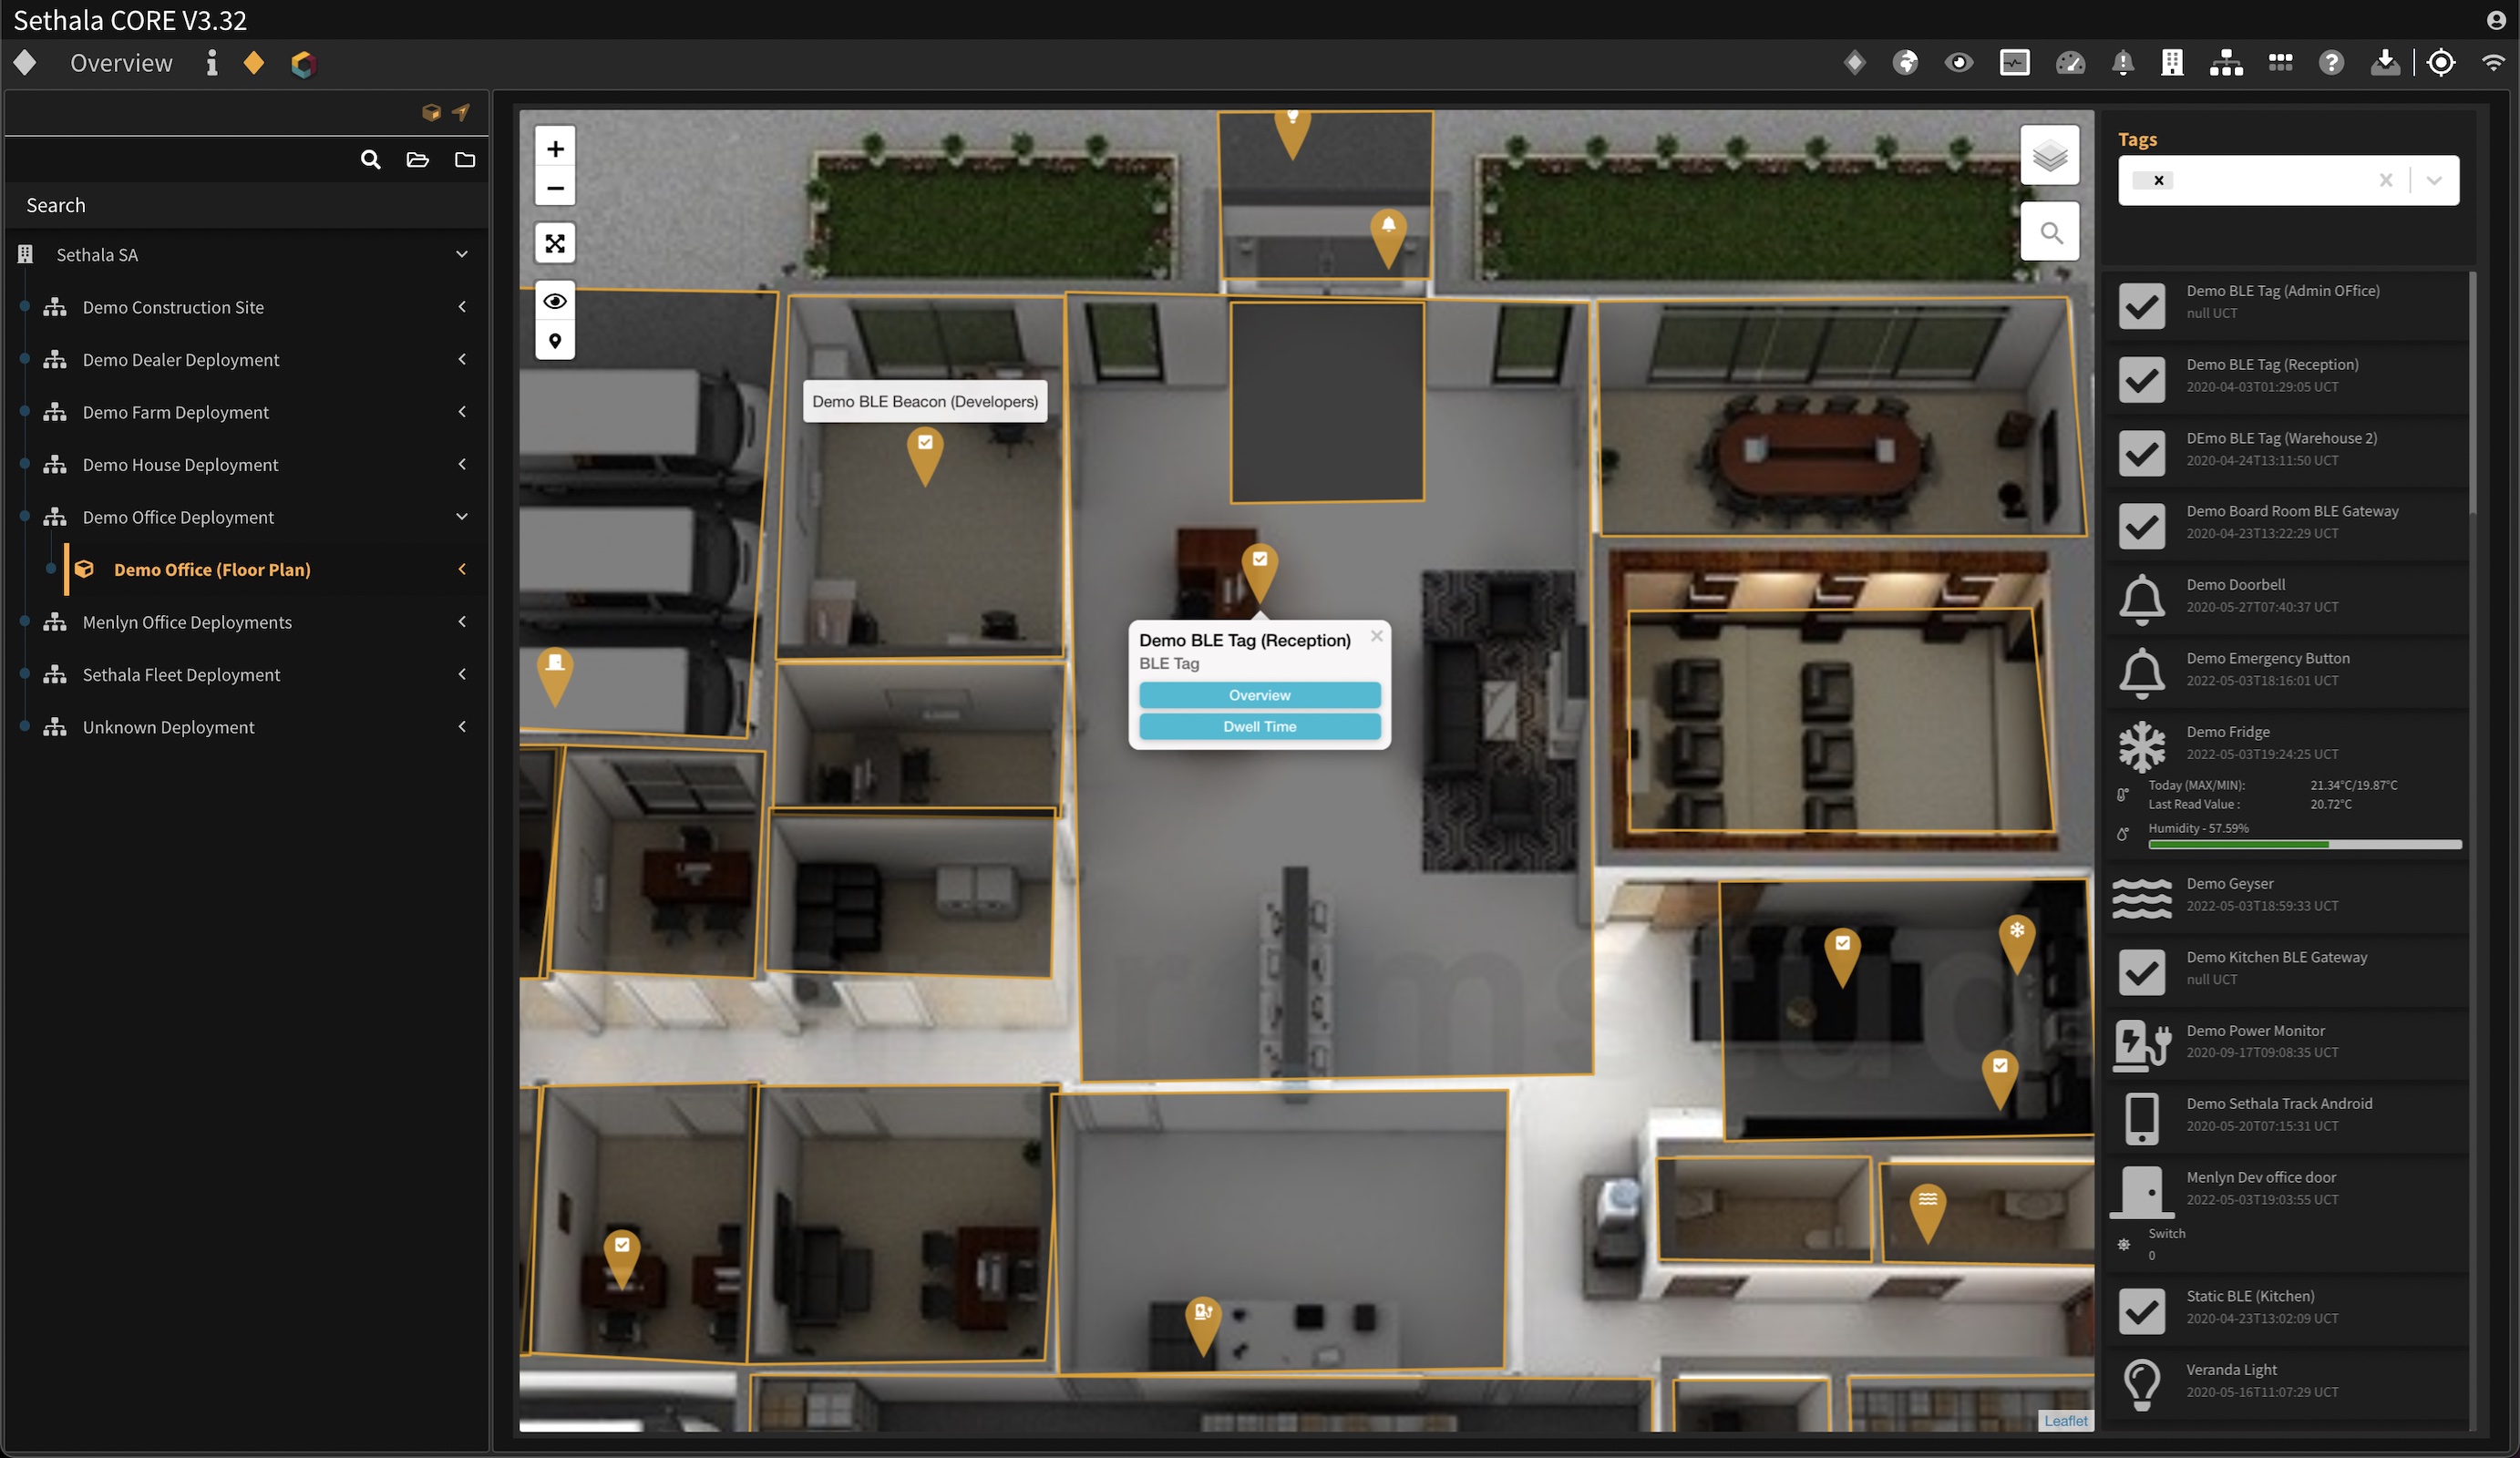
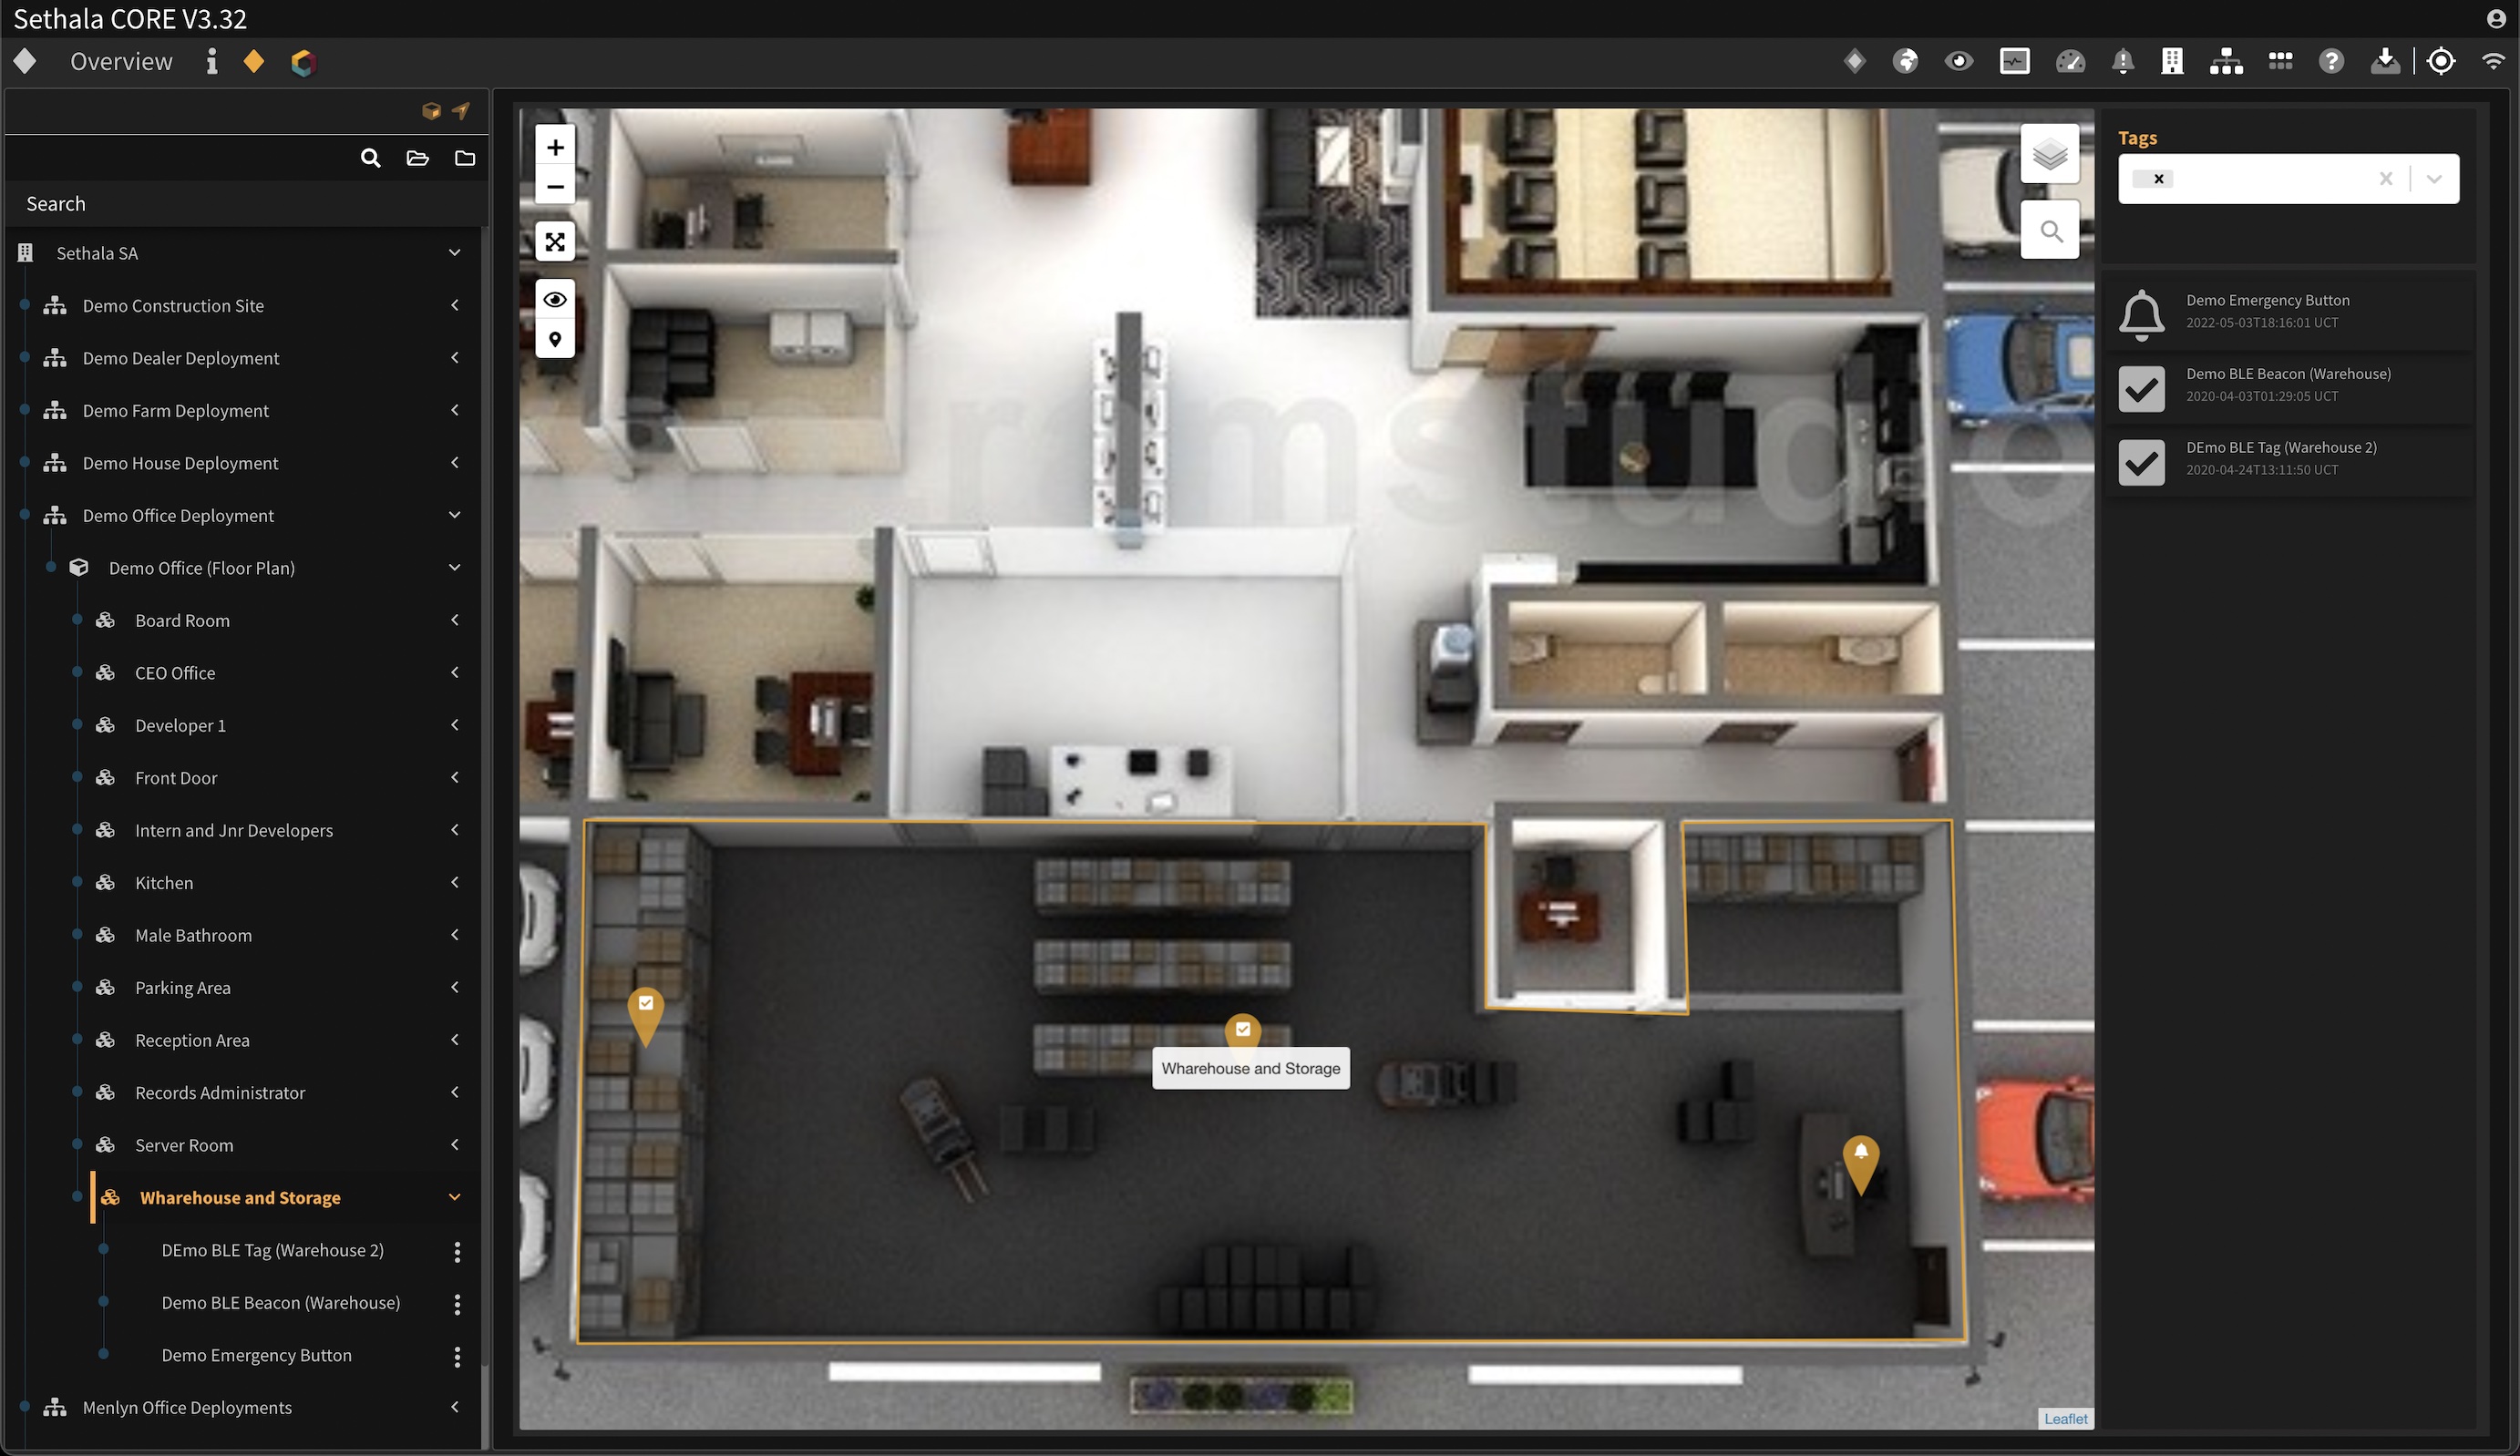
¶ Zone View (Indoor)
The Zone View reveals a floor plan summary of the selected Zone and the Things contained therein. From here you are also able to access the Thing View of a selected Thing.
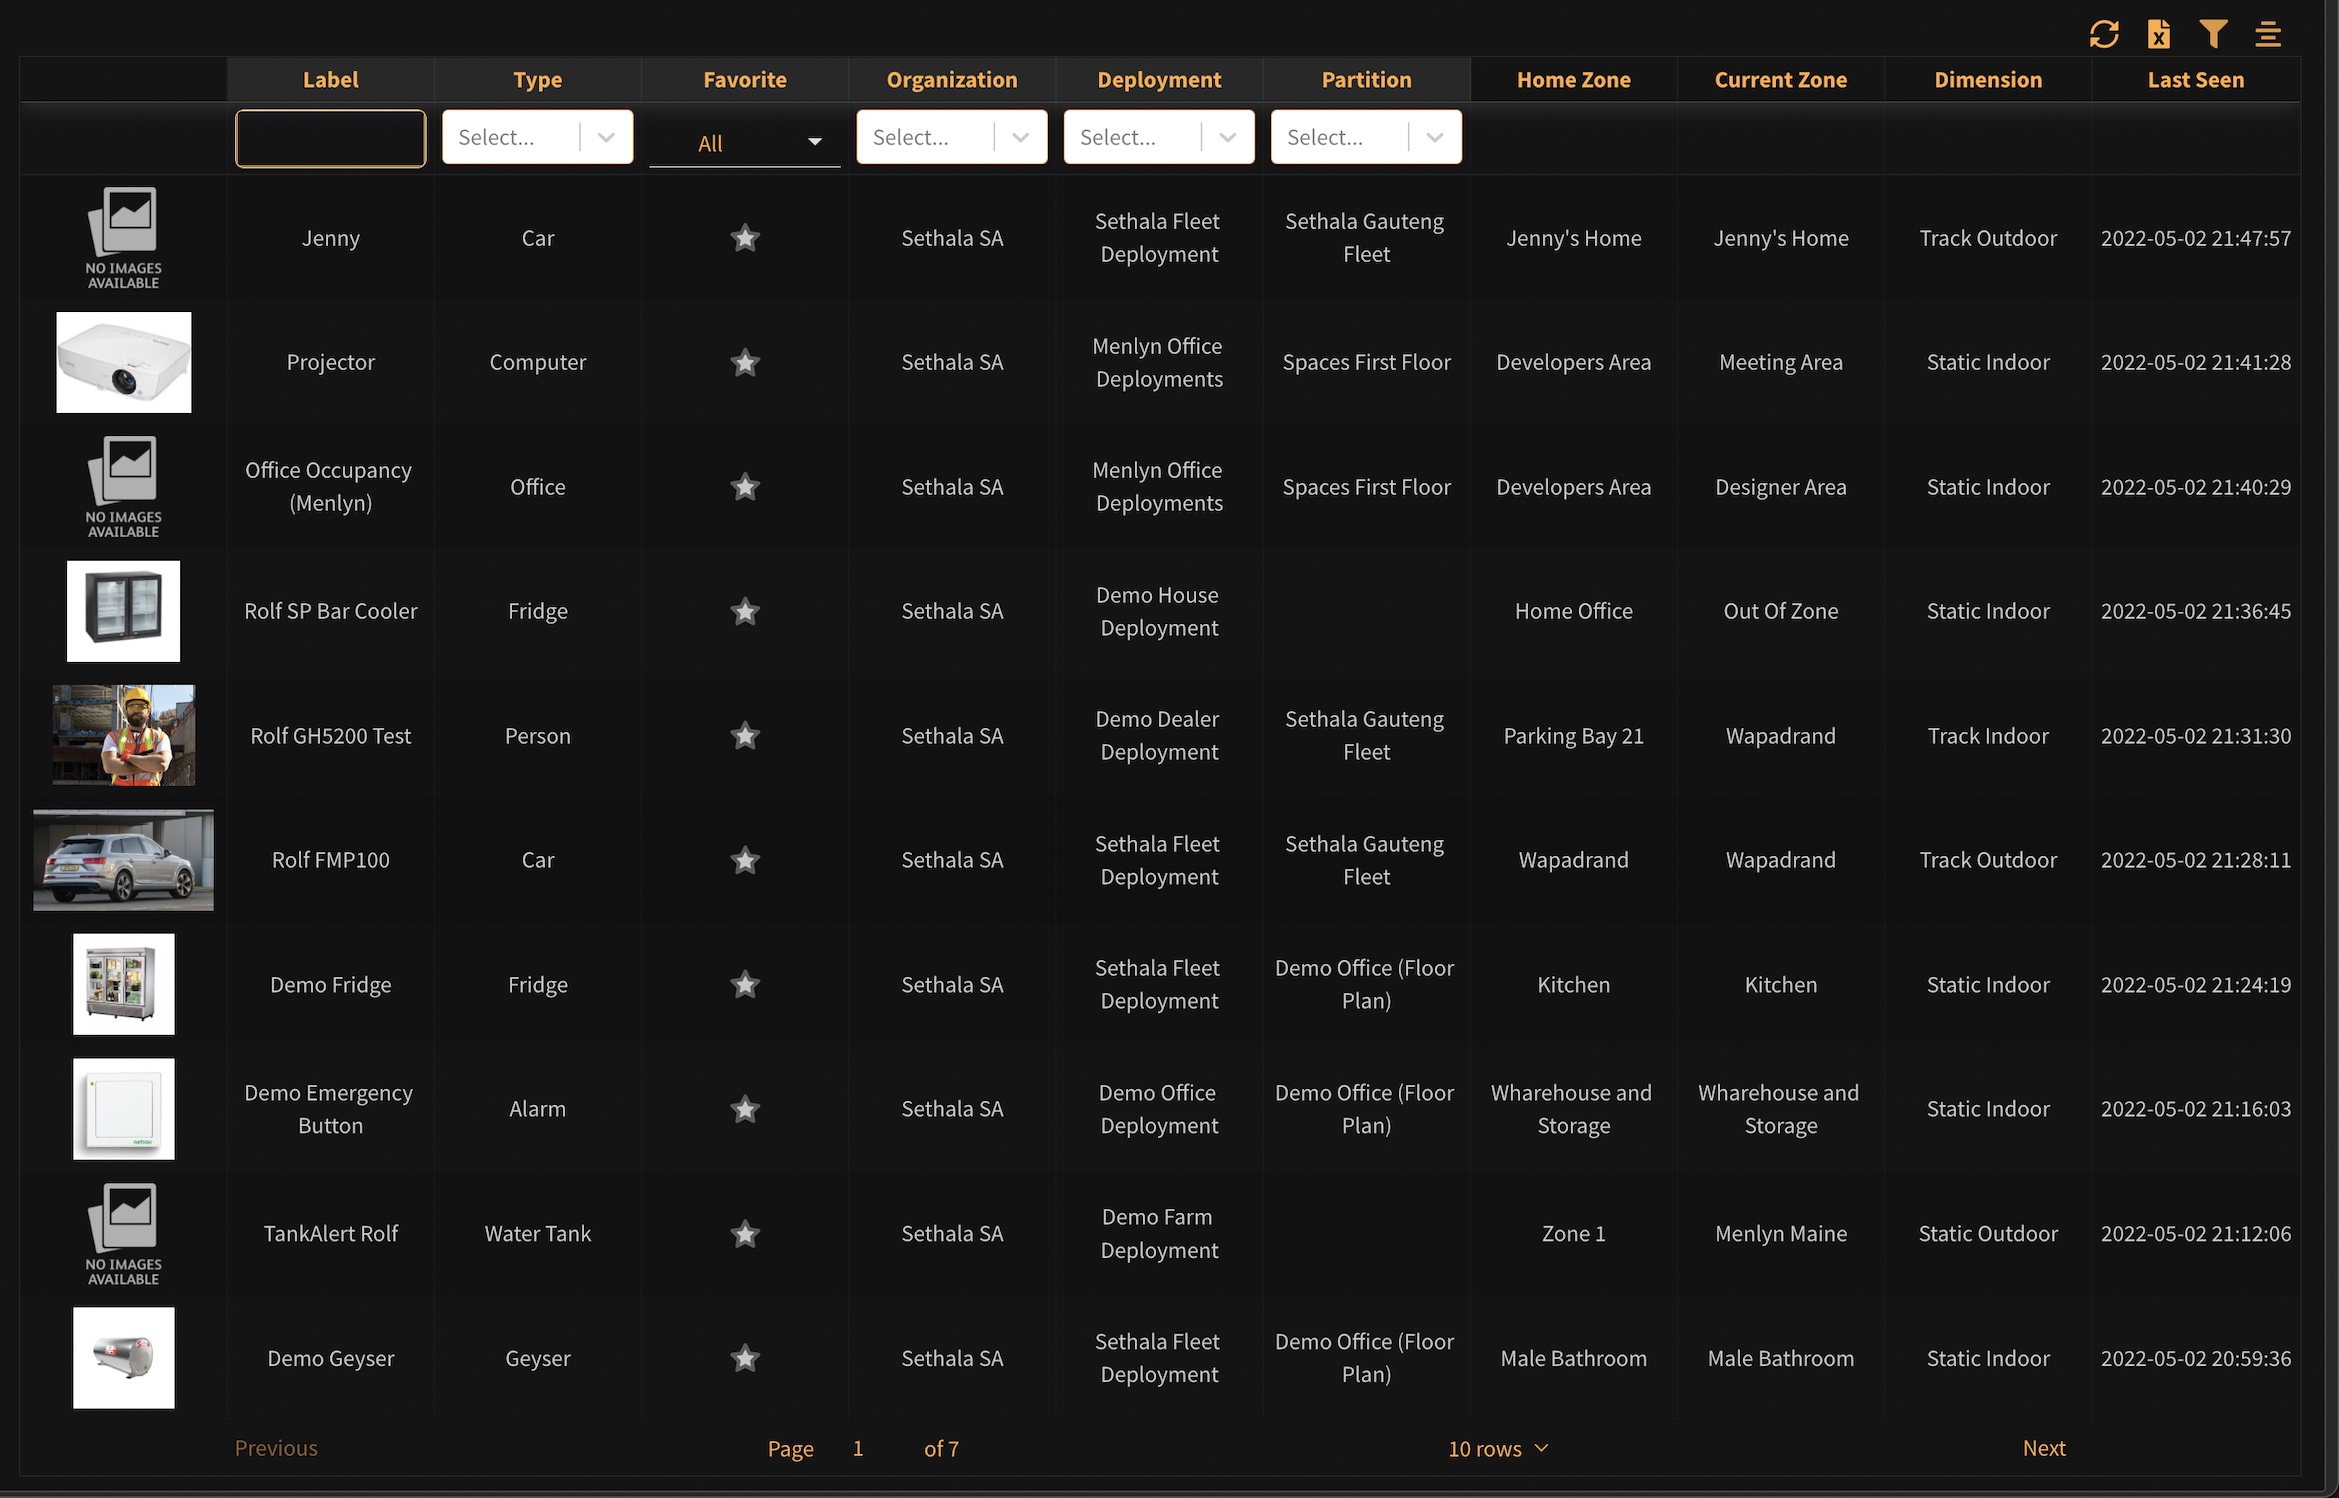
¶ Monitor
This feature shows a monitoring table of all Things with their latest data.
¶ Dashboards
This feature allows you to create customised dashboards.
¶ Alerts
Use this section to view alert history and configure Alert Notification Schedules.
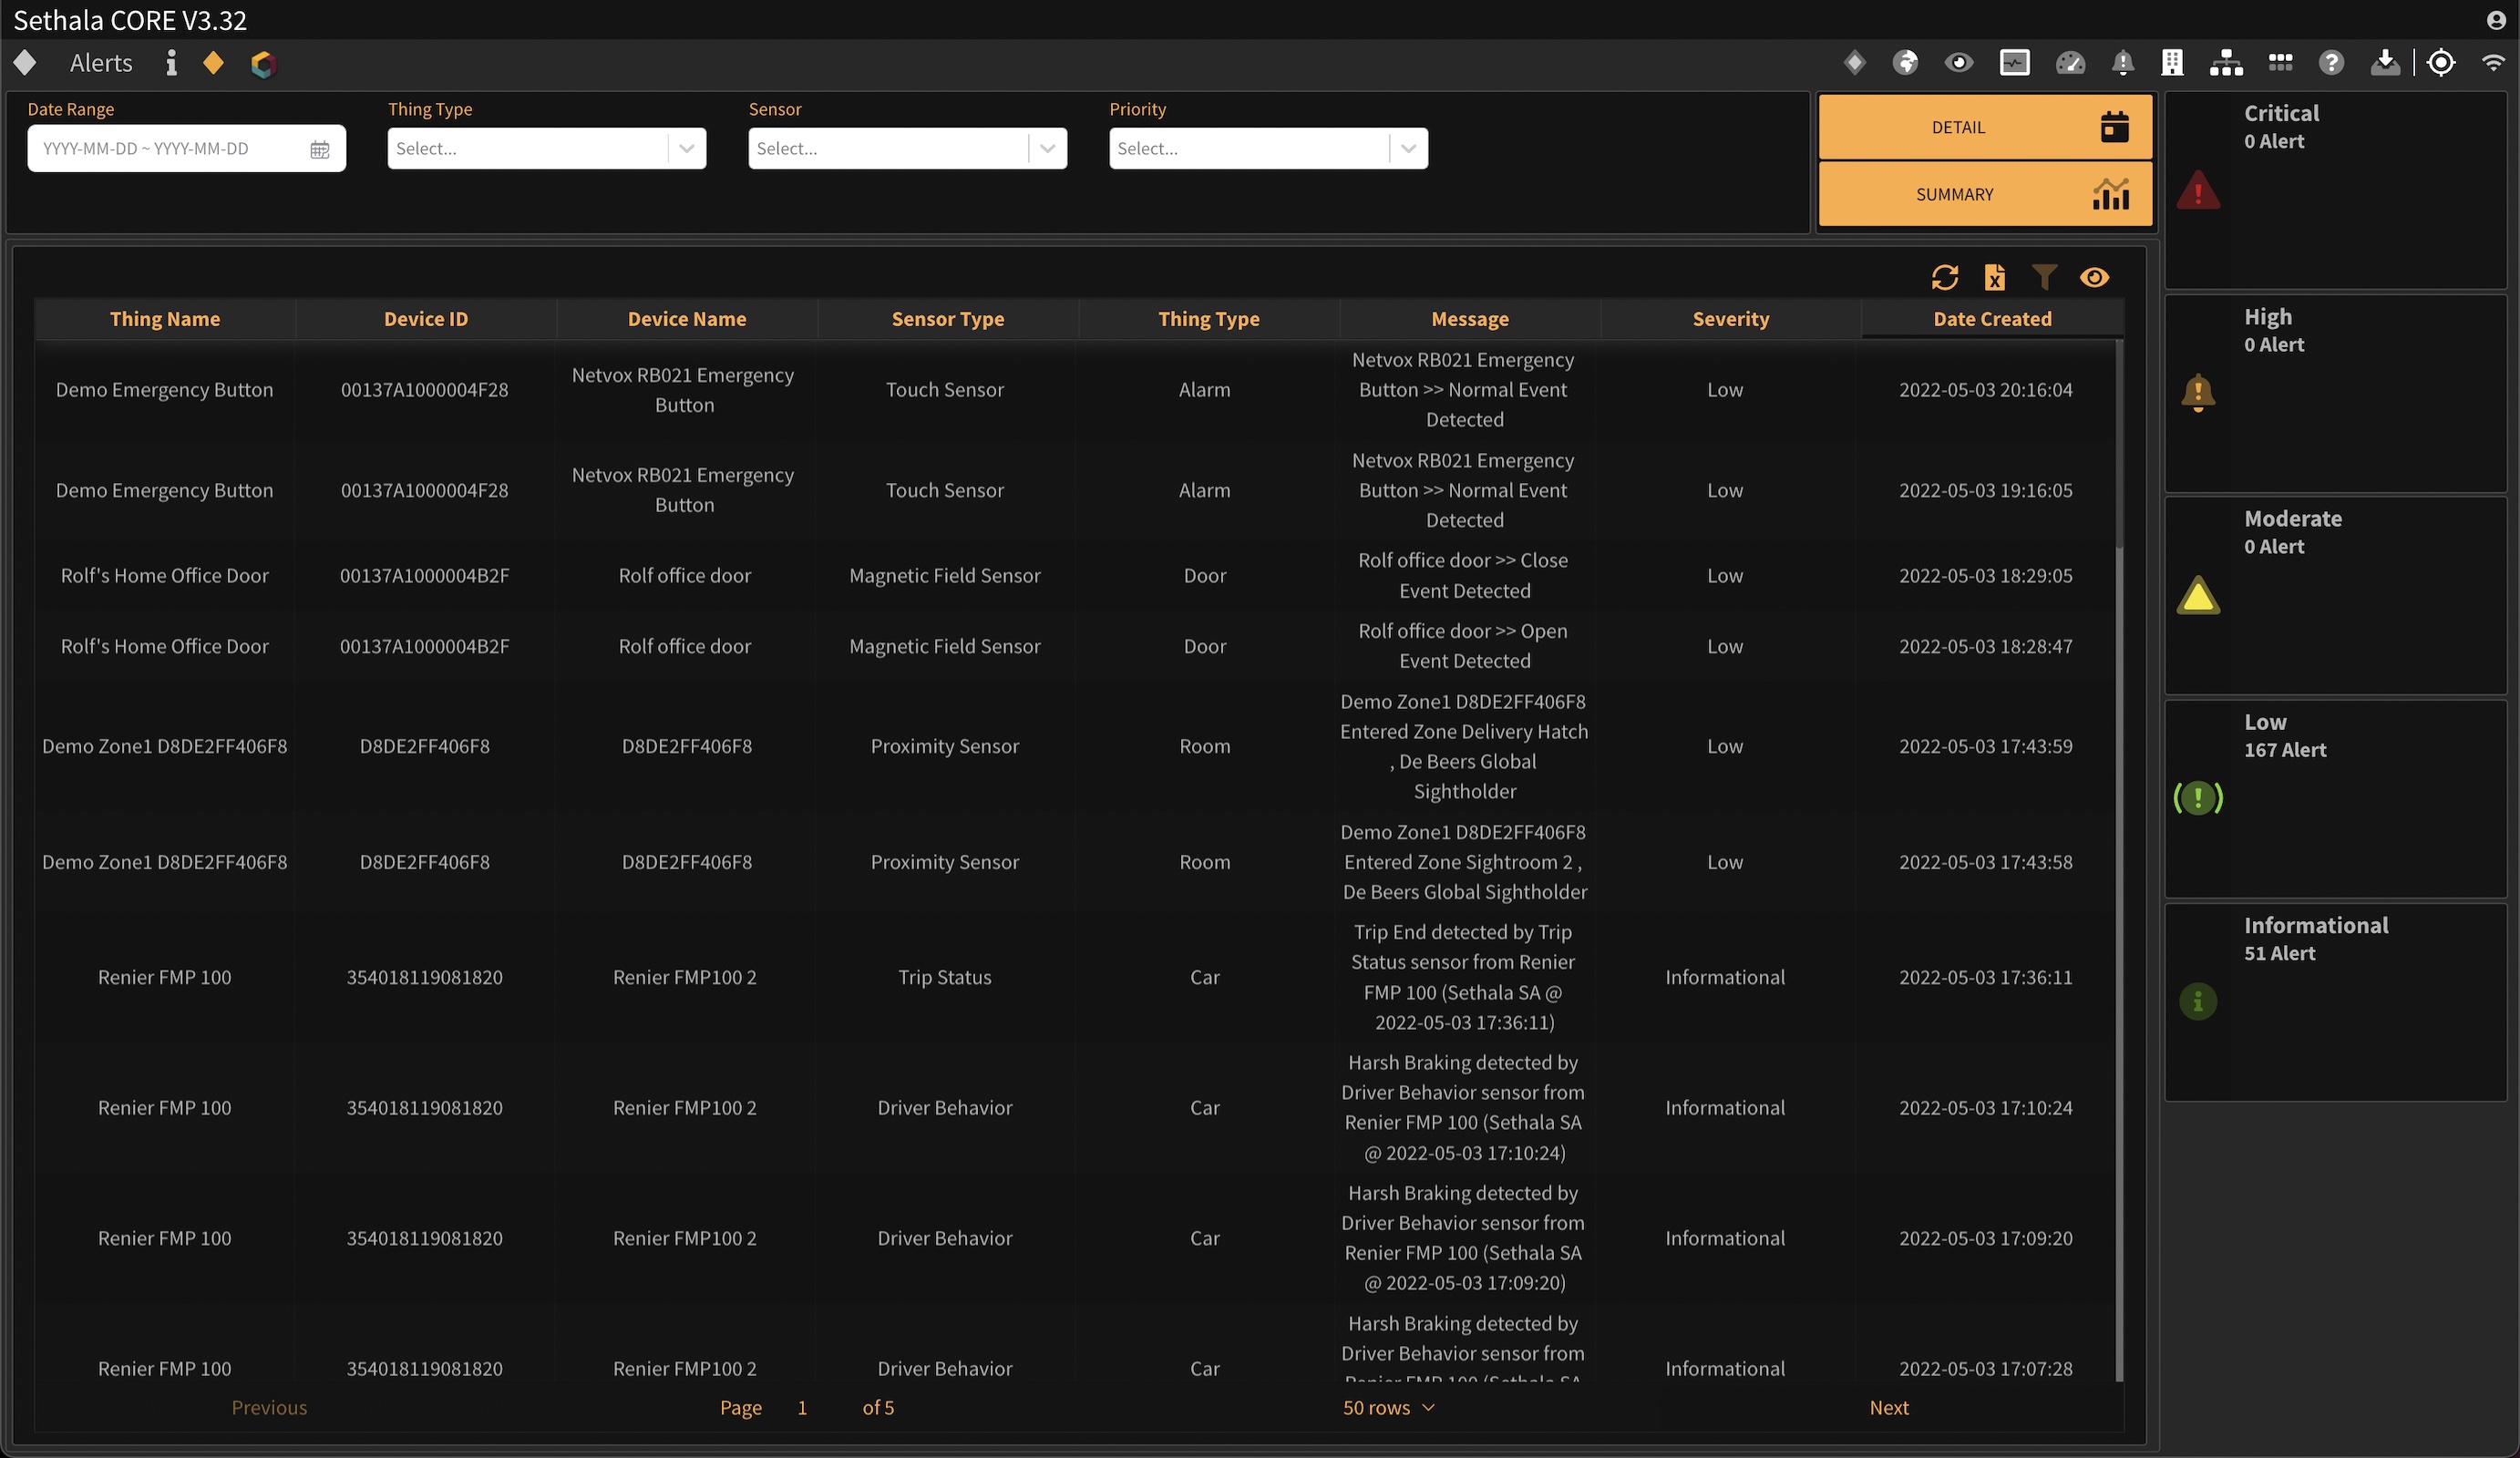
¶ Alert History
This feature show the Alerts generated based on Events from things.
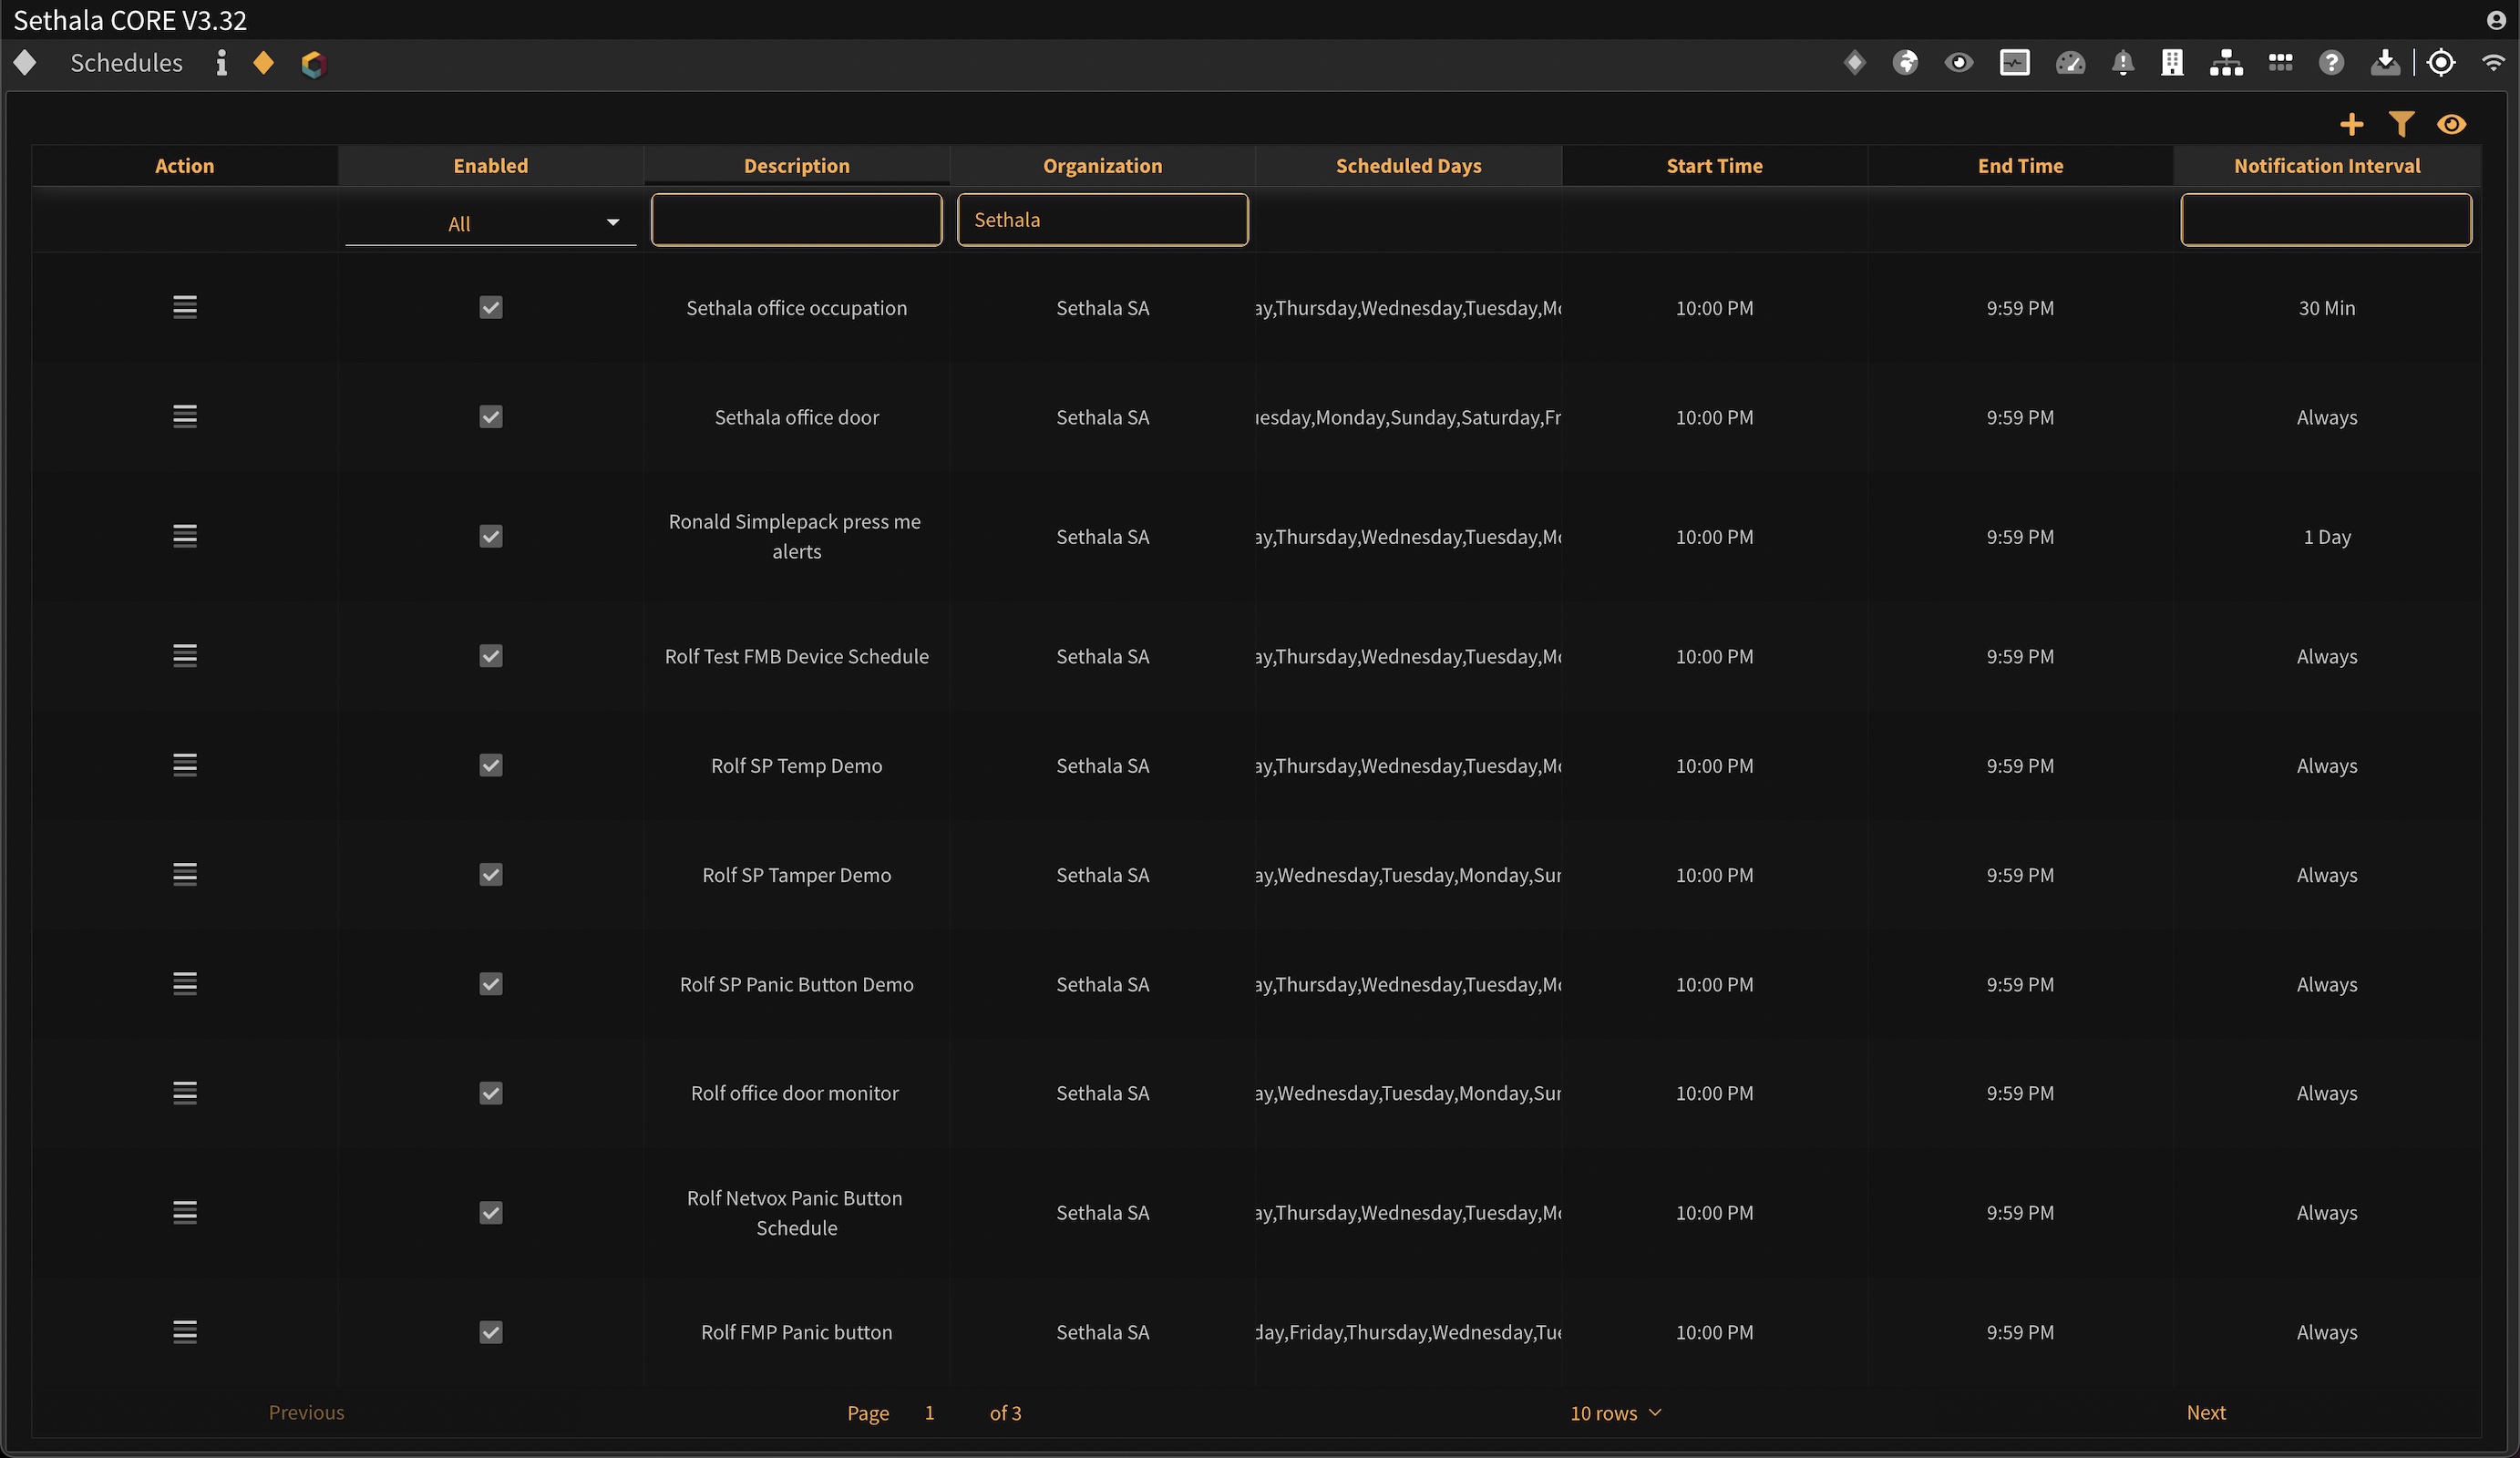
¶ Schedules
Configure and setup monitoring schedules.
¶ Zone Tracking
Use this section to configure Zone enter/exit monitoring and Alert notifications.
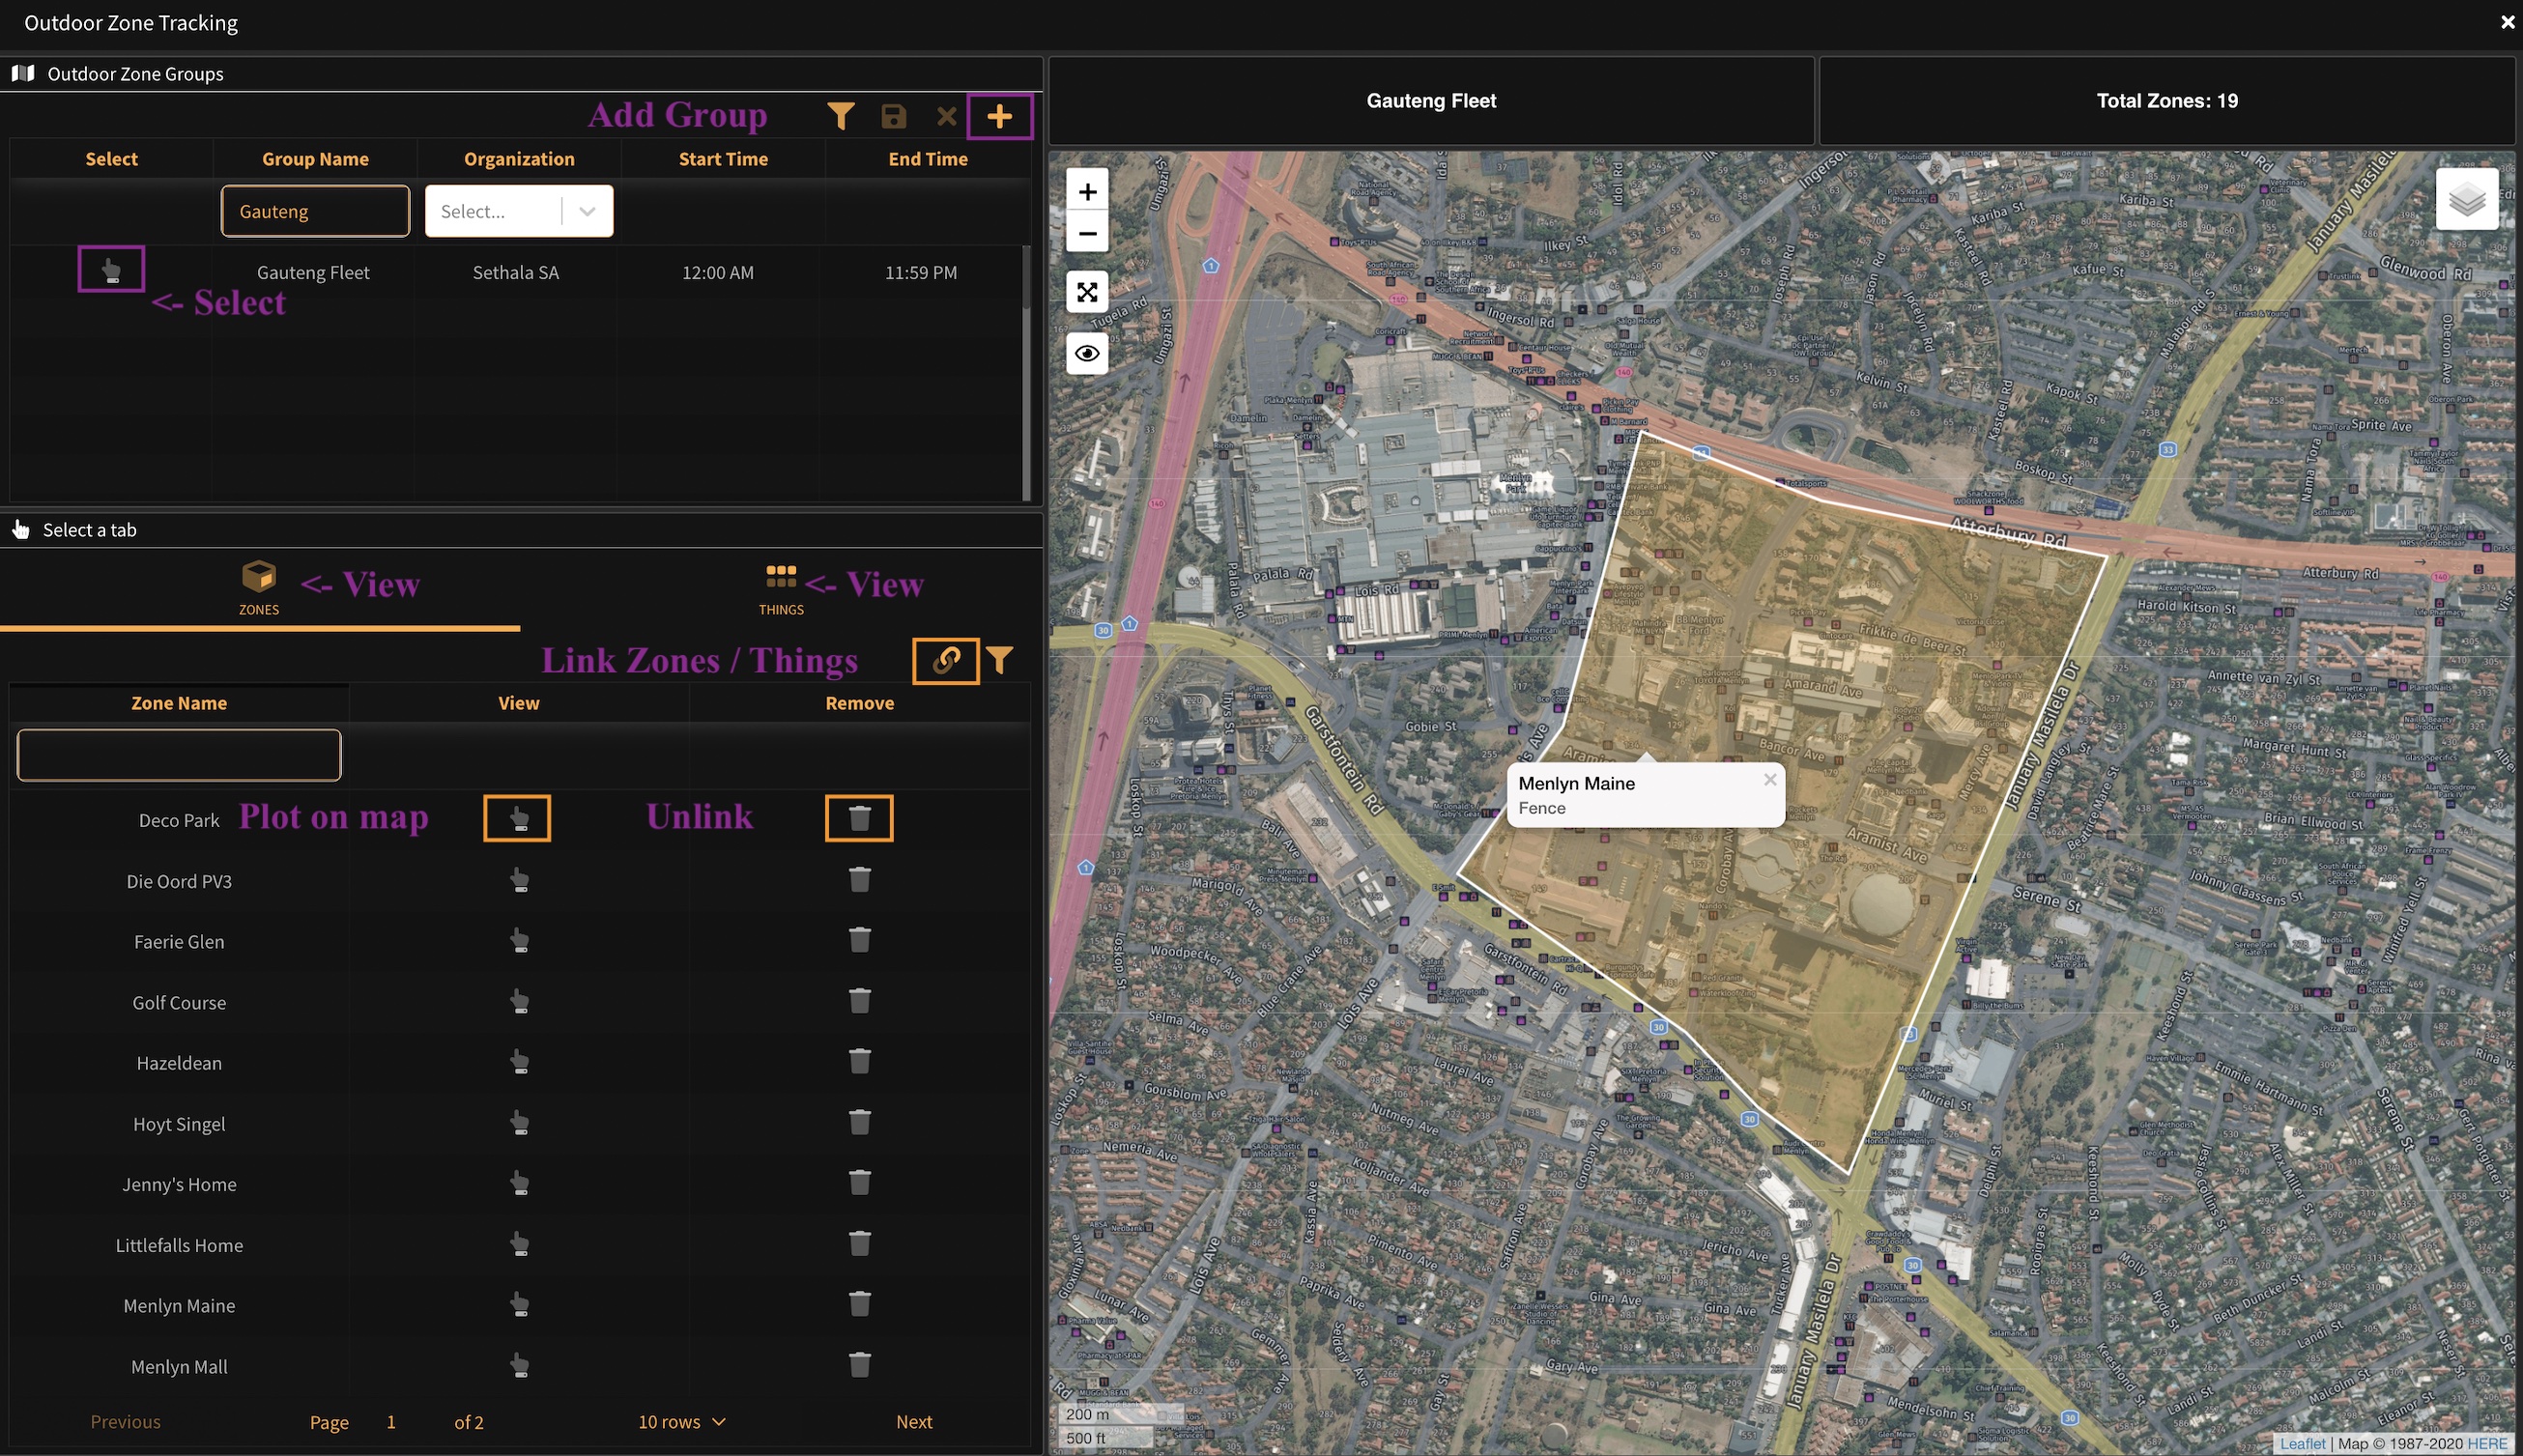
¶ Outdoor Zone Tracking
Configure outdoor Zone tracking. This feature is used to configure a Zone group with selected Zones and Things for monitoring Zone enter and exit conditions. You start by creating a Zone Group and setting a monitoring time for the group. Thereafter you link (add) Zones and Things to the Zone Group. Each monitored Thing added to the Zone Group will be monitored when entering and/or exiting a monitored Zone and each Contact associated with the selected Thing will receive a notification accordingly.
- Add Group: Use the top left table to list/manage/add Outdoor Zone Groups for monitoring.
- Select a Zone Group to view/update linked Zones and Things.
- Click the Zones or Things tab to view the Zones and Things linked to the Zone Group respectively.
- Select the Link Zones / Things button in the table toolbar to link / unlink Things and Zones respectively.
- Click the Plot on map button in the table to plot the Zone and/or Thing location on the map to the right.
- Click the Unlink button to remove the Zone or Thing from the Zone Group.
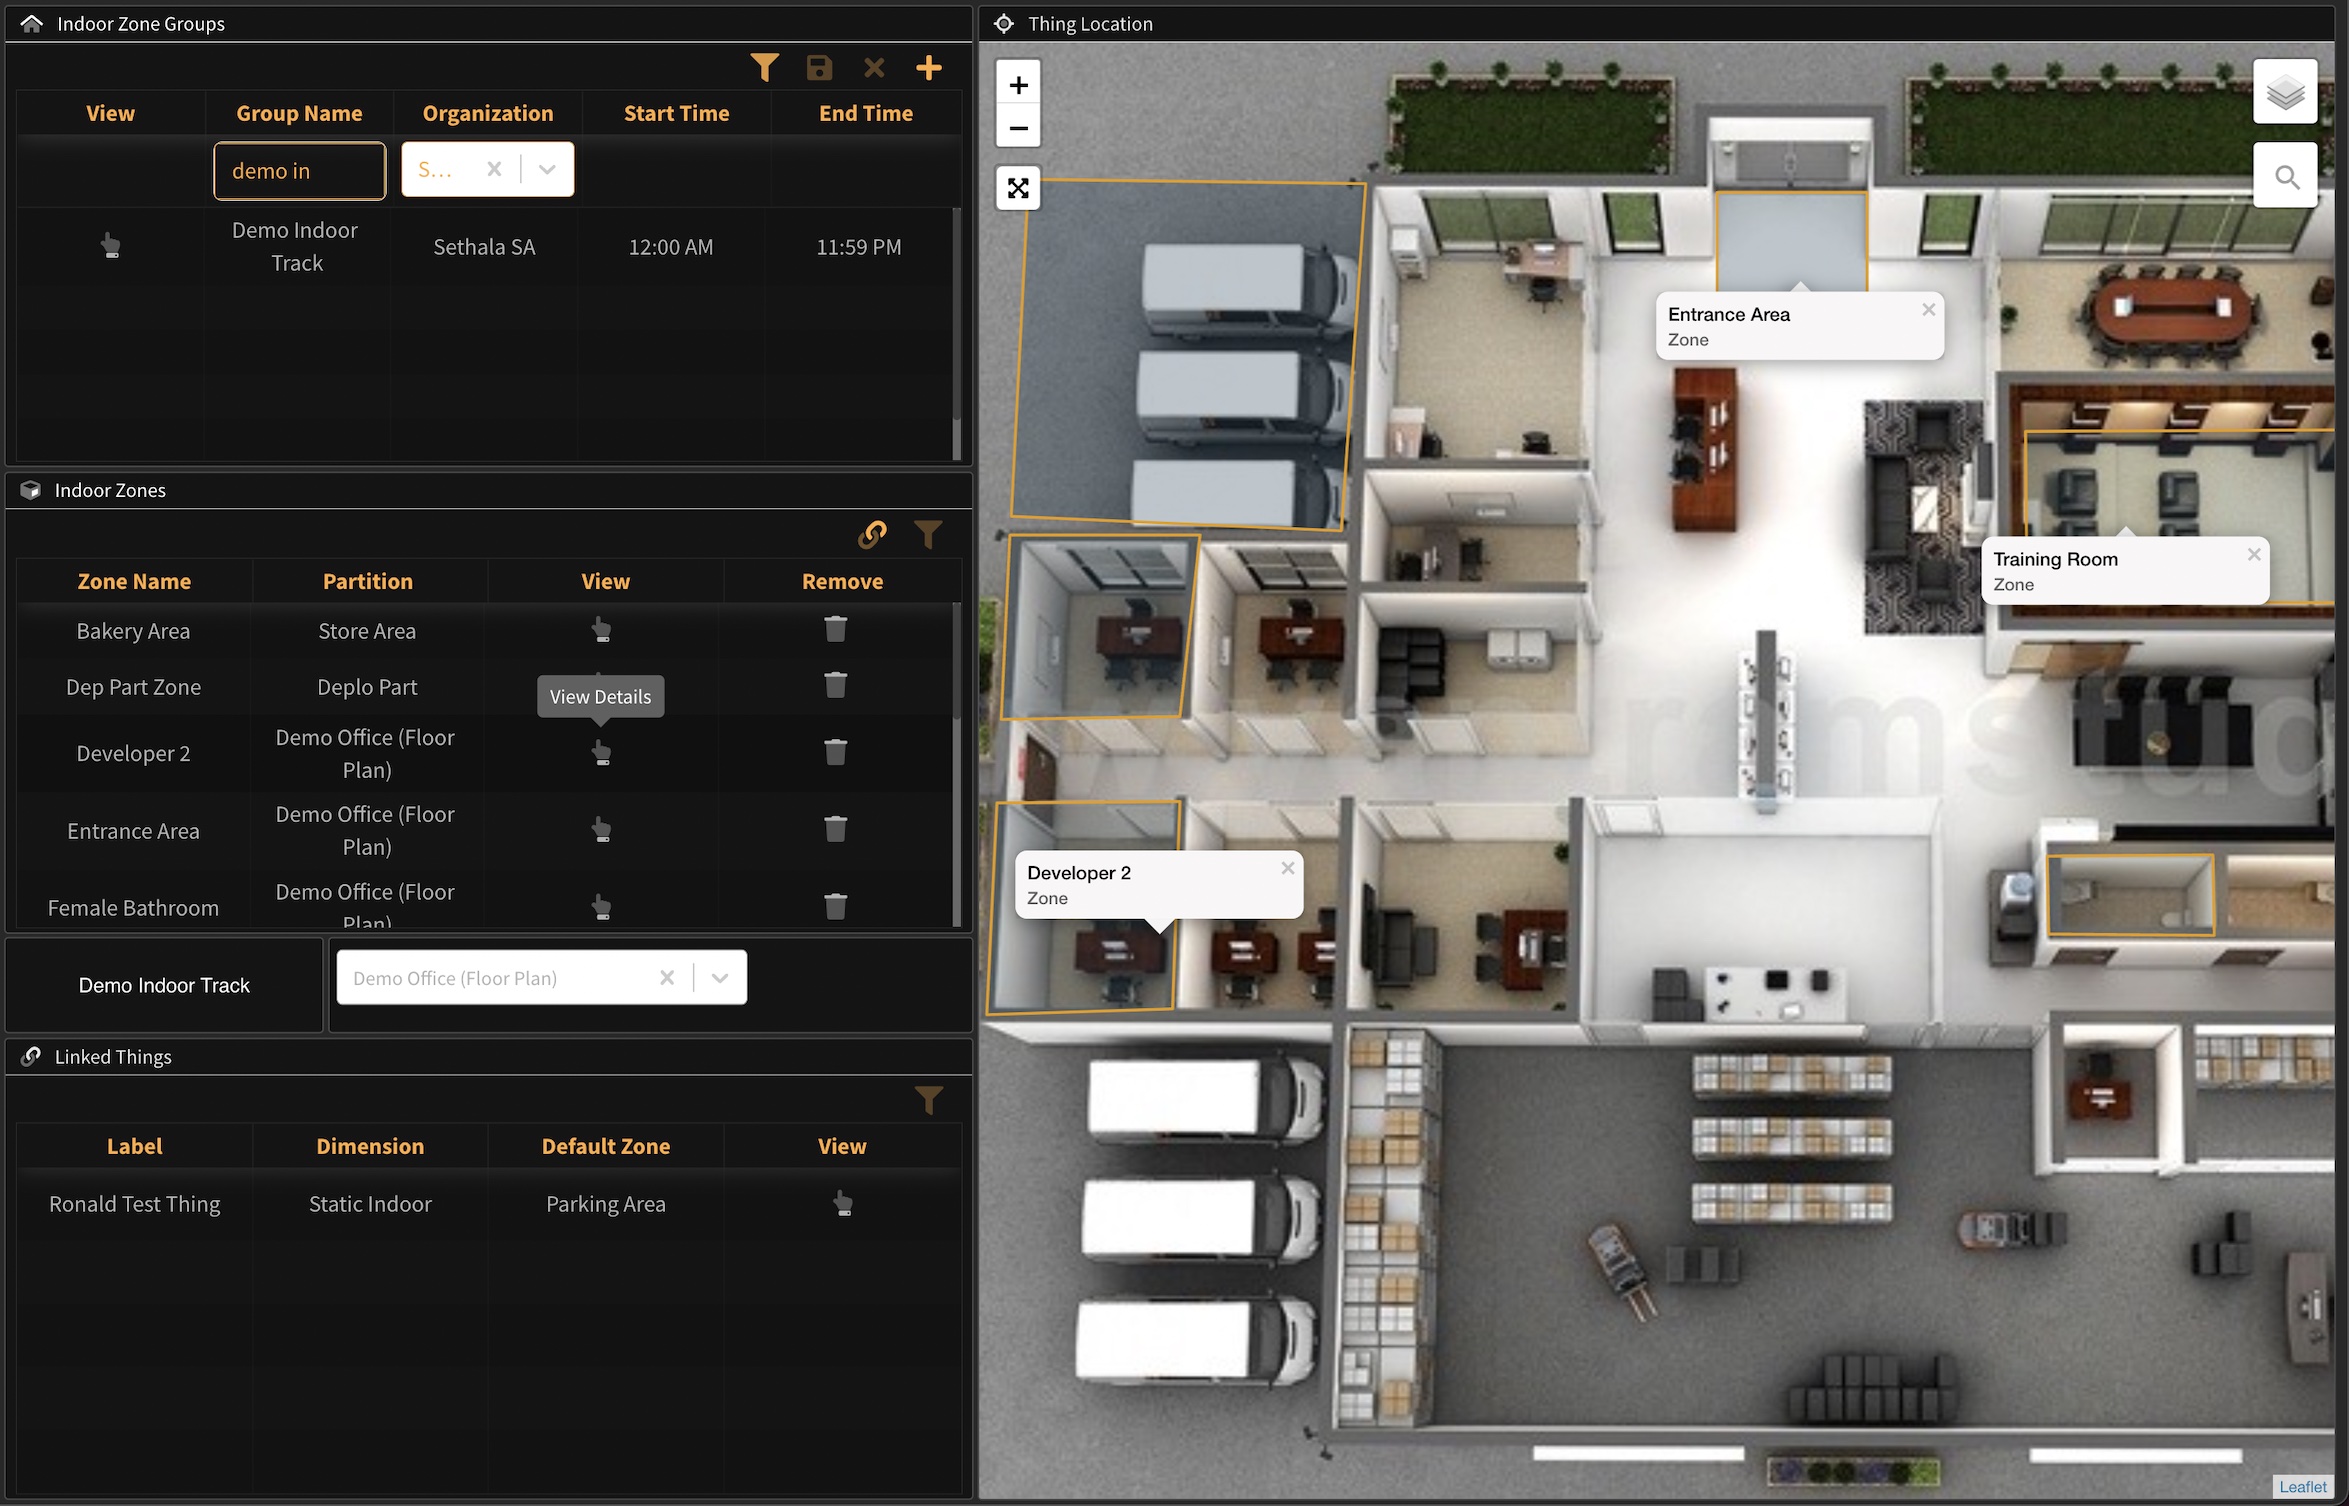
¶ Indoor Zone Tracking
Configure indoor Zone tracking. This feature is used to configure a Zone group with selected Zones and Things for monitoring Zone enter and exit conditions. You start by creating a Zone Group and setting a monitoring time for the group. Thereafter you link (add) Zones to the Zone Group. Any Thing entering / exiting a Zone added to the Zone Group will be monitored and each Contact associated with the selected Thing will receive a notification accordingly.
- Add Group: Use the top left table to list/manage/add Indoor Zone Groups for monitoring.
- Click View to view/update linked Zones.
- Select the Link Zones button in the table toolbar to link / unlink Zones respectively.
- Click the View Details button in the table to plot the Zone location on the map to the right.
- Click the Remove button to remove the Zone from the Zone Group.